目录
- 前言
- 一、安装包的下载
- 二、安装环境的准备
- 1、硬件环境要求
- 2、软件环境要求
- 3、软件依赖要求
- 4、关闭操作系统防火墙
- 6、设置操作系统字符集编码
- 7、设置时区和时间
- 8、关闭swap交换内存(可选)
- 9、设置网卡mtu值
- 10、关闭virbr0网卡
- 11、关闭removeipc[only for openeuler]
- 12、关闭history记录
- 13、设置root用户远程登录
- 14、配置banner
- 15、创建用户和用户组
- 16、设置sysctl.conf 不用配置
- 17、配置资源限制
- 18、关闭透明大页
- 19、创建目录
- 20、解压安装包
- 21、创建xml配置文件
- 22、设置/etc/hosts
- 23、执行预安装脚本
- 二、开始安装数据库
- 三、验证
- 四、卸载opengauss
本文对应视频链接如下
1、centos 7.6的下载
- 下载地址3个
http://archive.kernel.org/centos-vault/7.6.1810/isos/x86_64/
http://linuxsoft.cern.ch/centos-vault/7.6.1810/isos/x86_64/ - 经过测试,下面这个源下载速度比较快
http://mirror.nsc.liu.se/centos-store/7.6.1810/isos/x86_64/
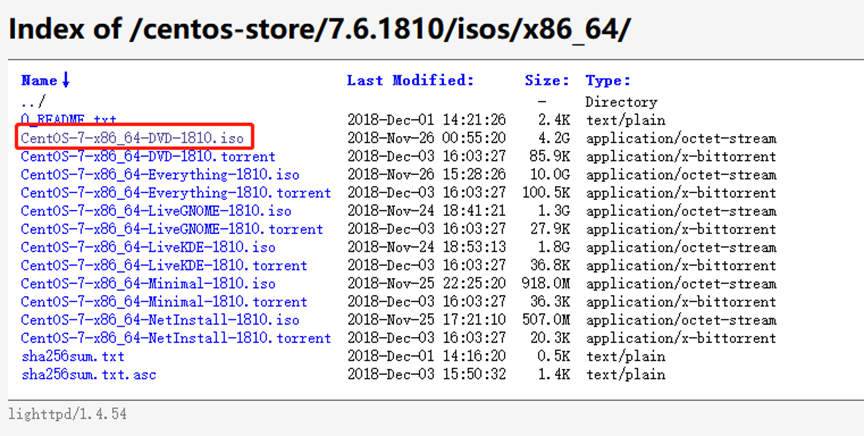
选择dvd版本就行
2、openeuler 20.03lts的下载
-
下载地址:
https://repo.openeuler.org/openeuler-20.03-lts-sp3/iso/x86_64/
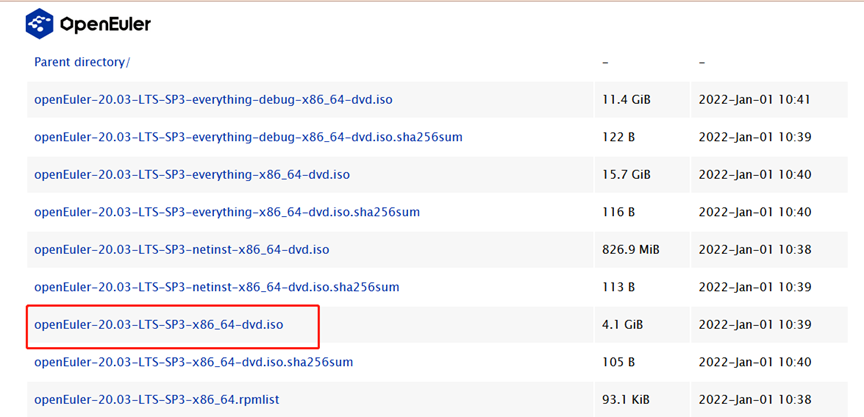
如果操作系统不是centos7.6怎么办?
修改/etc/redhad-release
3、opengauss安装包的下载
- 下载地址
https://opengauss.org/zh/download.html
选择最新版本:3.1.0
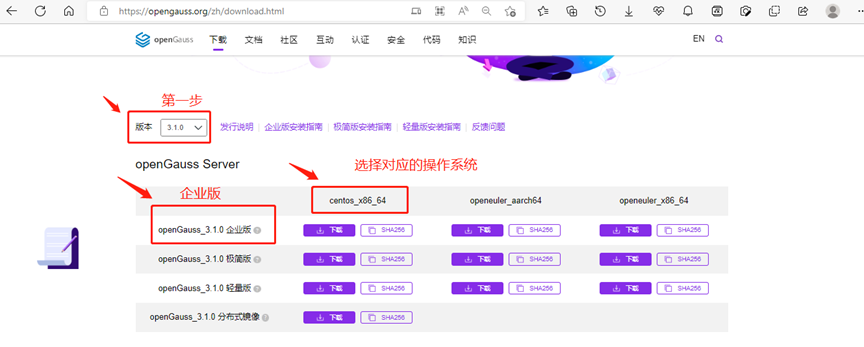
软件包下载完毕。
1、硬件环境要求
| 项目 | 配置描述 |
|---|---|
| 内存 | 功能调试建议32gb以上。 性能测试和商业部署时,单实例部署建议128gb以上。 复杂的查询对内存的需求量比较高,在高并发场景下,可能出现内存不足。 此时建议使用大内存的机器,或使用负载管理限制系统的并发。 |
| cpu | 功能调试最小1×8核,2.0ghz。 性能测试和商业部署时,单实例部署建议1×16核,2.0ghz。 cpu超线程和非超线程两种模式都支持。 说明:目前,opengauss仅支持arm服务器和基于x86_64通用pc服务器的cpu。 |
| 硬盘 | 用于安装opengauss的硬盘需最少满足如下要求: 至少1gb用于安装opengauss的应用程序。 每个主机需大约300mb用于元数据存储。 预留70%以上的磁盘剩余空间用于数据存储。 建议系统盘配置为raid1,数据盘配置为raid5,且规划4组raid5数据盘用于安装opengauss。有关raid的配置方法在本手册中不做介绍。请参考硬件厂家的手册或互联网上的方法进行配置,其中disk cache policy一项需要设置为disabled,否则机器异常掉电后有数据丢失的风险。 opengauss支持使用ssd盘作为数据库的主存储设备,支持sas接口和nvme协议的ssd盘,以raid的方式部署使用。 |
| 网络要求 | 300兆以上以太网。 建议网卡设置为双网卡冗余bond。 有关网卡冗余bond的配置方法在本手册中不做介绍。请参考硬件厂商的手册或互联网上的方法进行配置。 |
- 本次实验环境:
内存:4g
cpu 2x4
硬盘:20g
2、软件环境要求
| 软件类型 | 配置描述 |
|---|---|
| linux操作系统 | arm: openeuler 20.03lts(推荐采用此操作系统) 麒麟v10 asianux 7.5 x86: openeuler 20.03lts centos 7.6 asianux 7.6 说明:当前安装包只能在英文操作系统上安装使用。 |
| linux文件系统 | 剩余inode个数 > 15亿(推荐) |
| 工具 | bzip2 |
| python | openeuler:支持python 3.7.x centos:支持python 3.6.x 麒麟:支持python 3.7.x asianux:支持python 3.6.x 说明: python需要通过–enable-shared方式编译。 |
本次实验环境
linux操作系统:centos 7.6
3、软件依赖要求
| 所需软件 | 建议版本 |
|---|---|
| libaio-devel | 建议版本:0.3.109-13 |
| flex | 要求版本:2.5.31 以上 |
| bison | 建议版本:2.7-4 |
| ncurses-devel | 建议版本:5.9-13.20130511 |
| glibc-devel | 建议版本:2.17-111 |
| patch | 建议版本:2.7.1-10 |
| redhat-lsb-core | 建议版本:4.1 |
| readline-devel | 建议版本:7.0-13 |
| libnsl(openeuler x86环境中) | 建议版本:2.28-36 |
使用yum来安装依赖包
yum -y install libaio-devel flex bison ncurses-devel glibc-devel patch redhat-lsb-core readline-devel python3
4、关闭操作系统防火墙
- 目前仅支持在防火墙关闭的状态下进行安装。
设置防火墙开机不自动启动
systemctl disable firewalld.service
关闭防火墙
systemctl stop firewalld.service
设置selinux
vi /etc/selinux/config
修改为:selinux=disabled
在root用户下临时关闭selinux
setenforce 0
6、设置操作系统字符集编码
lang=en_us.utf-8
echo "lang=en_us.utf-8" >> /etc/profile
source /etc/profile
echo $lang
7、设置时区和时间
查询时区
timedatectl
timedatectl list-timezones |grep shanghai
timedatectl set-timezone asia/shanghai
修改时区和时间
ln -sf /usr/share/zoneinfo/asia/shanghai /etc/localtime
date -s "2021-04-29 15:51:50"
8、关闭swap交换内存(可选)
关闭swap交换内存是为了保障数据库的访问性能,避免把数据库的缓冲区内存淘汰到磁盘上。 如果服务器内存比较小,内存过载时,可打开swap交换内存保障正常运行。
- 关闭
swapoff -a
- 开启
swapon -a
9、设置网卡mtu值
将各数据库节点的网卡mtu值设置为相同大小。
操作步骤
执行如下命令查询服务器的网卡名称。
ifconfig
使用如下命令将各数据库节点的网卡mtu值设置为相同大小。mtu值推荐8192,要求不小于1500。
ifconfig ens33 mtu 8192
10、关闭virbr0网卡
centos 7.6
ifconfig virbr0 down
systemctl disable libvirtd.service
11、关闭removeipc[only for openeuler]
在各数据库节点上,关闭removeipc。centos操作系统无该参数,可以跳过该步骤。
sed -i '/^removeipc/d' /etc/systemd/logind.conf
sed -i '/^removeipc/d' /usr/lib/systemd/system/systemd-logind.service
echo "removeipc=no"  >> /etc/systemd/logind.conf
echo "removeipc=no"  >> /usr/lib/systemd/system/systemd-logind.service
systemctl daemon-reload
systemctl restart systemd-logind
loginctl show-session | grep removeipc
systemctl show systemd-logind | grep removeipc
12、关闭history记录
为避免指令历史记录安全隐患,需关闭各主机的history指令。
- 步骤 1 修改根目录下/etc/profile文件。
vim /etc/profile
- 步骤 2 设置histsize值为0。例如,系统中histsize默认值为1000,将其修改为0。
histsize=0
- 步骤 3 保存/etc/profile。
wq
- 步骤 4 设置/etc/profile生效。
source /etc/profile
13、设置root用户远程登录
修改permitrootlogin配置,允许用户远程登录。
- a. 打开sshd_config文件。
vim /etc/ssh/sshd_config
- b. 修改权限配置,可以使用以下两种方式实现:
注释掉“permitrootlogin no”。
#permitrootlogin no
将“permitrootlogin”改为“yes”。
permitrootlogin yes
14、配置banner
修改banner配置,去掉连接到系统时,系统提示的欢迎信息。
欢迎信息会干扰安装时远程操作的返回结果,影响安装正常执行。
- a. 编辑sshd_config文件。
vim /etc/ssh/sshd_config
- b. 修改banner配置,注释掉“banner”所在的行。
#banner xxxx
- c. 执行:wq保存并退出编辑页面。
使用如下命令使设置生效。
systemctl restart sshd.service
以root用户身份重新登录。
ssh xxx.xxx.xxx.xxx
15、创建用户和用户组
为了实现安装过程中安装帐户权限最小化,及安装后opengauss的系统运行安全性,安装脚本在安装过程中会自动按照用户指定内容创建安装用户,并将此用户作为后续运行和维护opengauss的管理员帐户。
1、用户组:dbgrp
初始化安装环境时,由-g参数所指定的安装用户所属的用户组。
该用户组如果不存在,则会自动创建,也可提前创建好用户组。
在执行gs_preinstall脚本时会检查权限。
gs_preinstall脚本会自动赋予此组中的用户对安装目录、数据目录的访问和执行权限。
2、用户:omm
初始化安装环境时,由-u参数所指定和自动创建的操作系统用户。
此用户具备数据库的最高操作权限,此用户初始密码由用户指定。
从安全性考虑,用户所属组是dbgrp
操作:
groupadd dbgrp
useradd -g dbgrp omm
echo 'omm@123' | passwd --stdin omm
16、设置sysctl.conf 不用配置
vi /etc/sysctl.conf
net.ipv4.tcp_retries1 = 5
net.ipv4.tcp_syn_retries = 5
net.sctp.path_max_retrans = 10
net.sctp.max_init_retransmits = 10
net.ipv4.tcp_max_tw_buckets = 10000
net.ipv4.tcp_tw_reuse = 1
net.ipv4.tcp_tw_recycle = 1
net.ipv4.tcp_keepalive_time = 30
net.ipv4.tcp_keepalive_intvl = 30
net.ipv4.tcp_retries2 = 12
net.ipv4.ip_local_reserved_ports = 15400-15407,20050-20057
net.core.wmem_max = 21299200
net.core.rmem_max = 21299200
net.core.wmem_default = 21299200
net.core.rmem_default = 21299200
kernel.sem = 250 6400000 1000 25600
net.ipv4.tcp_rmem = 8192 250000 16777216
net.ipv4.tcp_wmem = 8192 250000 16777216
vm.min_free_kbytes = 201318
net.core.netdev_max_backlog = 65535
net.ipv4.tcp_max_syn_backlog = 65535
net.core.somaxconn = 65535
kernel.shmall = 1152921504606846720
kernel.shmmax = 18446744073709551615
执行命令,使其生效
sysctl -p
问题:
sysctl: cannot stat /proc/sys/net/sctp/path_max_retrans: no such file or directory
sysctl: cannot stat /proc/sys/net/sctp/max_init_retransmits: no such file or directory
解决方式:安装sctp
lsmod |grep sctp
yum -y install lksctp*
modprobe sctp
再次执行sysctl -p
17、配置资源限制
echo "* soft stack 3072" >> /etc/security/limits.conf
echo "* hard stack 3072" >> /etc/security/limits.conf
echo "* soft nofile 1000000" >> /etc/security/limits.conf
echo "* hard nofile 1000000" >> /etc/security/limits.conf
echo "* soft nproc unlimited" >> /etc/security/limits.d/90-nproc.conf
- 查看
tail -n 4 /etc/security/limits.conf
tail -n 1 /etc/security/limits.d/90-nproc.conf
18、关闭透明大页
echo never > /sys/kernel/mm/transparent_hugepage/defrag
echo never > /sys/kernel/mm/transparent_hugepage/enabled
echo 'echo never > /sys/kernel/mm/transparent_hugepage/defrag' >> /etc/rc.d/rc.local
echo 'echo never > /sys/kernel/mm/transparent_hugepage/enabled' >> /etc/rc.d/rc.local
chmod  x /etc/rc.d/rc.local
/usr/bin/sh /etc/rc.d/rc.local
19、创建目录
mkdir -p /opt/software/opengauss
chmod 755 -r /opt/software
20、解压安装包
cd /root
tar -zxvf opengauss-3.1.0-centos-64bit-all.tar.gz -c /soft/opengauss/
继续解压安装包opengauss-3.1.0-centos-64bit-om.tar.gz
tar -zxvf opengauss-3.1.0-centos-64bit-om.tar.gz

解压出来的内容比较多
chmod -r 777 /opt/software/opengauss
21、创建xml配置文件
- 需要修改的地方:
数据库节点名称
nodenames value=node1_hostname
sn=node1_hostname
把value后面的值改为主机名
ip地址
节点ip,与数据库节点名称列表一一对应
backip1s value=192.168.204.16
backip1 value=192.168.204.16
sship1 value=192.168.204.16
端口
dataportbase value=15400
22、设置/etc/hosts
配置了几个ip都要对应到hosts中
vi /etc/hosts
[root@master01 om]# cat /etc/hosts
127.0.0.1   localhost localhost.localdomain localhost4 localhost4.localdomain4
::1         localhost localhost.localdomain localhost6 localhost6.localdomain6
192.168.204.16master01
192.168.204.141 master01
23、执行预安装脚本
export my_hostname=master01
cd /opt/software/opengauss/script
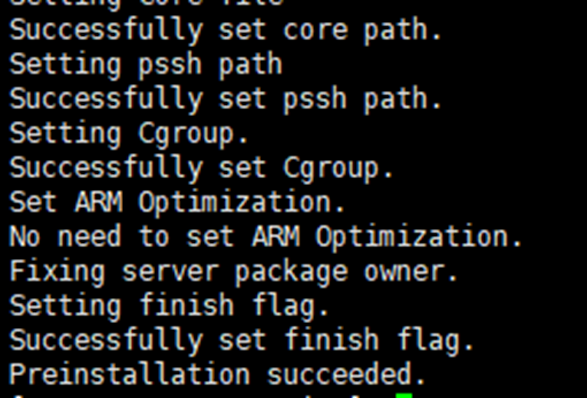
./gs_preinstall -u omm -g dbgrp -x /opt/software/open.xml
- 查系统环境
./gs_checkos -i a -h master01 –detail
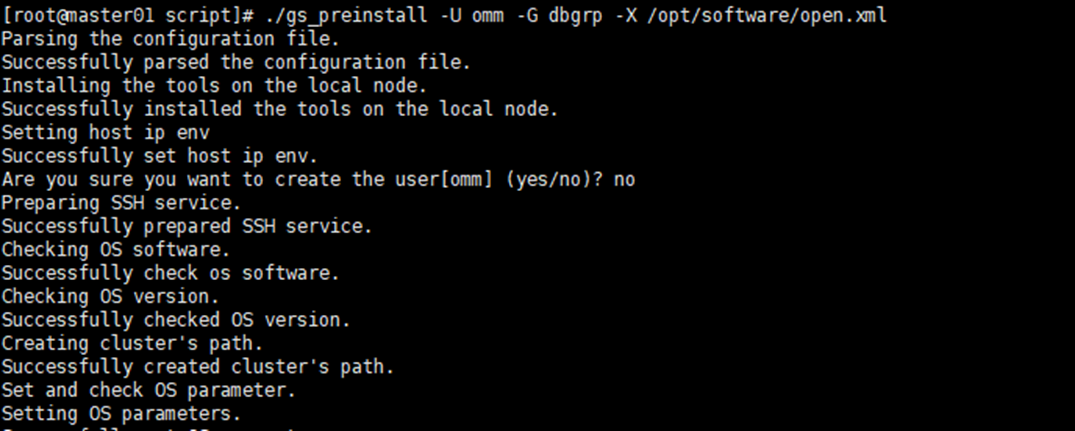
1、切换用户
必须使用上面预安装指定的用户进行安装
su – omm
2、开始安装
使用xml配置文件
./gs_install -x /opt/software/open.xml
需要输入密码,密码要求:
- 最少包含8个字符。
- 不能和用户名、当前密码(alter)、或当前密码反序相同。
- 至少包含大写字母(a-z)、小写字母(a-z)、数字、非字母数字字符(限定为~!@#$%^&*()-_= |[{}];:,<.>/?)四类字符中的三类字符。
su - omm
gs_install -x /opt/software/open.xml
parsing the configuration file.
check preinstall on every node.
successfully checked preinstall on every node.
creating the backup directory.
last time end with start cluster.
continue this step.
successfully created the backup directory.
begin deploy..
successfully started cluster.
successfully installed application.
end deploy..
安装成功
su - omm
gs_om -t status

cluster_state:normal
- 登录库
gsql -d postgres -p 15400
卸载opengauss的过程包含卸载opengauss和对opengauss服务器的环境做清理。
执行卸载
opengauss提供了卸载脚本帮助用户完整的卸载opengauss。
操作步骤
- 以操作系统用户omm登录数据库主节点。
- 使用gs_uninstall卸载opengauss。
1、卸载opengauss
集群卸载
su - omm
gs_uninstall --delete-data
本地卸载
gs_uninstall --delete-data -l
2、清理环境
一键式环境清理
在opengauss卸载完成后,如果不需要在环境上重新部署opengauss,可以运行脚本gs_postuninstall对opengauss服务器上环境信息做清理。opengauss环境清理是对环境准备脚本gs_preinstall所做设置的清理。
前提条件
- opengauss卸载执行成功。
- root用户互信可用。
- 只能使用root用户执行gs_postuninstall命令。
操作步骤
- 以root用户登录opengauss服务器。
- 查看root用户互信是否建立,如果root用户没有建立互信,需要手工建立root用户互信。
root用户
cd /opt/software/opengauss/script
./gs_postuninstall -u omm -x /opt/software/open.xml --delete-user --delete-group