目录
前言
在rhel7上安装单节点的vertica数据库
现在,我们在rhel7操作系统上快速安装一个单节点的vertica数据库。基本步骤是:
- 安装ce(社区免费)版本的rpm包 vertica-11.0.1-2.x86_64.rhel6.rpm
- 用install_vertica脚本配置vertica数据库集群
- 根据提示信息排错并重新配置集群
- 在vertica集群上创建一个新的数据库
- 创建连接用户并授权
安装ce(社区免费)版本的rpm包 vertica-11.0.1-2.x86_64.rhel6.rpm
将rpm包上传到服务器并用命令进行安装,如下所示:
[root@test ~]# ls -lrht vertica-11.0.1-2.x86_64.rhel6.rpm
-rw-r--r-- 1 root root 514m dec  6 16:07 vertica-11.0.1-2.x86_64.rhel6.rpm
[root@test ~]# rpm -ivh --nodeps vertica-11.0.1-2.x86_64.rhel6.rpm
warning: vertica-11.0.1-2.x86_64.rhel6.rpm: header v3 rsa/sha256 signature, key id f54b82a0: nokey
preparing...                          ################################# [100%]
updating / installing...
   1:vertica-11.0.1-2                 ################################# [100%]
vertica analytic database v11.0.1-2 successfully installed on host test
to complete your new installation and configure the cluster, run:
 /opt/vertica/sbin/install_vertica
to complete your vertica upgrade, run:
 /opt/vertica/sbin/update_vertica
----------------------------------------------------------------------------------
important
----------------------------------------------------------------------------------
before upgrading vertica, you must backup your database.  after you restart your
database after upgrading, you cannot revert to a previous vertica software version.
----------------------------------------------------------------------------------
view the latest vertica documentation at https://www.vertica.com/documentation/vertica/此时,可以看到/opt目录下生成了vertica目录,其大小为1.9g。
[root@test opt]# cd vertica/
[root@test vertica]# ls -lrht
total 3.5m
drwxrwxr-x  2 root root    6 nov 20 08:04 log
-rw-r--r--  1 root root 3.4m nov 20 08:11 licenses
drwxr-xr-x  2 root root   22 dec 15 08:53 agent
drwxr-xr-x  2 root root 4.0k dec 15 08:53 bin
drwxr-xr-x  4 root root  101 dec 15 08:53 config
drwxr-xr-x  3 root root   26 dec 15 08:53 examples
drwxr-xr-x  2 root root   57 dec 15 08:53 en-us
drwxr-xr-x  2 root root   45 dec 15 08:53 include
drwxr-xr-x  3 root root  101 dec 15 08:53 java
drwxr-xr-x  2 root root 4.0k dec 15 08:53 lib
drwxr-xr-x  2 root root   31 dec 15 08:53 lib64
drwxrwxr-x  4 root root   36 dec 15 08:53 oss
drwxr-xr-x 19 root root 4.0k dec 15 08:54 packages
drwxr-xr-x  2 root root 4.0k dec 15 08:54 sbin
drwxr-xr-x  2 root root 4.0k dec 15 08:54 scripts
drwxrwxr-x  5 root root   91 dec 15 08:54 sdk
drwxr-xr-x  9 root root  132 dec 15 08:54 share
drwxrwxr-x  8 root root   80 dec 15 08:54 spread
[root@test vertica]# du -sh .
1.9g .用install_vertica脚本配置vertica数据库集群
接下来,我们用install_vertica脚本配置vertica集群。详见如下操作:
[root@test ~]# /opt/vertica/sbin/install_vertica --hosts 127.0.0.1 --rpm ~/vertica-11.0.1-2.x86_64.rhel6.rpm --dba-user dbadmin
vertica analytic database 11.0.1-2 installation tool
>> validating options...
mapping hostnames in --hosts (-s) to addresses...
>> starting installation tasks.
>> getting system information for cluster (this may take a while)...
default shell on nodes:
127.0.0.1 /bin/bash
>> validating software versions (rpm or deb)...
warning: /root/vertica-11.0.1-2.x86_64.rhel6.rpm: header v3 rsa/sha256 signature, key id f54b82a0: nokey
>> beginning new cluster creation...
successfully backed up admintools.conf on 127.0.0.1
>> creating or validating db admin user/group...
password for new dbadmin user (empty = disabled)  <<== 输入 密码 回车 (注意: 不回显)
successful on hosts (1): 127.0.0.1
    provided db admin account details: user = dbadmin, group = verticadba, home = /home/dbadmin
    creating group... adding group
    validating group... okay
    creating user... adding user, setting credentials
    validating user... okay
>> validating node and cluster prerequisites...
prerequisites not fully met during local (os) configuration for
verify-127.0.0.1.xml:
    hint (s0305): https://www.vertica.com/docs/11.0.x/html/index.htm#cshid=s0305
        hint(es0305): tz is unset for dbadmin. consider updating .profile or
        .bashrc
    warn (n0010): https://www.vertica.com/docs/11.0.x/html/index.htm#cshid=n0010
        warn(en0010): linux iptables (firewall) has some non-trivial rules in
        tables: filter, mangle
    warn (s0112): https://www.vertica.com/docs/11.0.x/html/index.htm#cshid=s0112
        warn(es0112): vm.swappiness is higher than recommended: your 30 > 1
    fail (s0312): https://www.vertica.com/docs/11.0.x/html/index.htm#cshid=s0312
        fail(es0312): transparent hugepages is set to 'never'. must be 'always'.
system prerequisites failed.  threshold = warn
        hint: fix above failures or use --failure-threshold
installation failed with errors.
****
admintools and your existing vertica databases may be unavailable.
investigate the above warnings/errors and re-run installation.
****根据提示信息排错并重新配置集群
从上面的安装中,我们可以看到有四个重要的消息提示,它们依次为:、、和,顺便还告知了网址和采取的解决办法。我们接着进行如下操作:
-- https://www.vertica.com/docs/11.0.x/html/content/authoring/installationguide/beforeyouinstall/tzenvironmentvar.htm?cshid=s0305
[root@test ~]# echo 'export tz="asia/shanghai"' >> /home/dbadmin/.bash_profile
-- https://www.vertica.com/docs/11.0.x/html/content/authoring/installationguide/beforeyouinstall/checkforswappiness.htm?cshid=s0112
[root@test ~]# echo 0 > /proc/sys/vm/swappiness
[root@test ~]# echo 'vm.swappiness = 0' >> /etc/sysctl.conf
-- https://www.vertica.com/docs/11.0.x/html/content/authoring/installationguide/beforeyouinstall/transparenthugepages.htm?cshid=s0312
[root@test ~]# echo always > /sys/kernel/mm/transparent_hugepage/enabled
[root@test ~]# vi /etc/rc.local
......
if test -f /sys/kernel/mm/transparent_hugepage/enabled; then
   echo always > /sys/kernel/mm/transparent_hugepage/enabled
fi
......
"/etc/rc.local" 34l, 1357c written
[root@test ~]# chmod x /etc/rc.d/rc.local经过上述操作以后,我们接着用install_vertica脚本进行配置,注意:最后加上参数和值“--failure-threshold fail”。因为warn (n0010)的警告非常奇怪,而且我们已经关闭防火墙,verticam6米乐安卓版下载官网上说,只能加这个参数来回避这个问题。
[root@test ~]# /opt/vertica/sbin/install_vertica --hosts 127.0.0.1 --rpm ~/vertica-11.0.1-2.x86_64.rhel6.rpm --dba-user dbadmin --failure-threshold fail
vertica analytic database 11.0.1-2 installation tool
>> validating options...
mapping hostnames in --hosts (-s) to addresses...
>> starting installation tasks.
>> getting system information for cluster (this may take a while)...
default shell on nodes:
127.0.0.1 /bin/bash
>> validating software versions (rpm or deb)...
warning: /root/vertica-11.0.1-2.x86_64.rhel6.rpm: header v3 rsa/sha256 signature, key id f54b82a0: nokey
>> beginning new cluster creation...
successfully backed up admintools.conf on 127.0.0.1
>> creating or validating db admin user/group...
successful on hosts (1): 127.0.0.1
    provided db admin account details: user = dbadmin, group = verticadba, home = /home/dbadmin
    creating group... group already exists
    validating group... okay
    creating user... user already exists
    validating user... okay
>> validating node and cluster prerequisites...
prerequisites not fully met during local (os) configuration for
verify-127.0.0.1.xml:
    warn (n0010): https://www.vertica.com/docs/11.0.x/html/index.htm#cshid=n0010
        warn(en0010): linux iptables (firewall) has some non-trivial rules in
        tables: filter, mangle
system prerequisites passed.  threshold = fail
>> establishing db admin ssh connectivity...
installing/repairing ssh keys for dbadmin
>> setting up each node and modifying cluster...
creating vertica data directory...
updating agent...
creating node node0001 definition for host 127.0.0.1
... done
>> sending new cluster configuration to all nodes...
starting or restarting agent...
>> completing installation...
running upgrade logic
installation complete.
please evaluate your hardware using vertica's validation tools:
    https://www.vertica.com/docs/11.0.x/html/index.htm#cshid=valscript
to create a database:
  1. logout and login as dbadmin. (see note below)
  2. run /opt/vertica/bin/admintools as dbadmin
  3. select create database from the configuration menu
  note: installation may have made configuration changes to dbadmin
  that do not take effect until the next session (logout and login).
to add or remove hosts, select cluster management from the advanced menu.在vertica集群上创建一个新的数据库
用上的中的来创建一个新的数据库vdb_oracle_perf。具体操作如下所示:
1. 用su命令将从操作系统的root用户切换到dbadmin用户,查看集群状态,它应该返回空值。注:因为返回行很冗长,所以在此省略了屏幕上提示的17条条款内容。
[root@test ~]# su - dbadmin
[dbadmin@test ~]$
[dbadmin@test ~]$ /opt/vertica/bin/admintools -t view_cluster
micro focus end user license agreement - enterprise version
......
5200-0949 v1.0, 2017
? 米乐app官网下载 copyright 2015-2017 entit software llc
enter accept to accept license terms & conditions, or reject to not accept the license and quit: accept  <<== 输入 accept
 db | host | state
---- ------ -------
2. 创建数据库“vdb_oracle_perf”,并设置密码为“oracle_perf”。
[dbadmin@test ~]$ /opt/vertica/bin/admintools -t create_db --data_path=/home/dbadmin --catalog_path=/home/dbadmin --database=vdb_oracle_perf --password=oracle_perf --hosts=localhost3. 用vsql命令登录到客户端,密码为前面设置的密码,最终出现提示符“dbadmin=> ”。
[dbadmin@test ~]$ /opt/vertica/bin/vsql
password:  <<== 输入密码(不回显)
welcome to vsql, the vertica analytic database interactive terminal.
type:  \h or \? for help with vsql commands
       \g or terminate with semicolon to execute query
       \q to quit
dbadmin=> 创建连接用户并授权
dbadmin=> create user qwz identified by 'oracle';
dbadmin=> grant usage on schema public to qwz;将oracle数据库的db time查询导入vertica数据库
- 将oracle数据库的db time的两个sql查询分别保存为csv文件
- 将两个csv文件上传到服务器/home/dbadmin目录下
- 用dbeaver 21.3.1客户端工具连接到vertica数据库
- 在dbeaver 21.3.1上创建两张表awr_dbtime和awr_dbtime_2
- 将两个csv文件分别导入刚创建的两张表中
将oracle数据库的db time的两个sql查询分别保存为csv文件
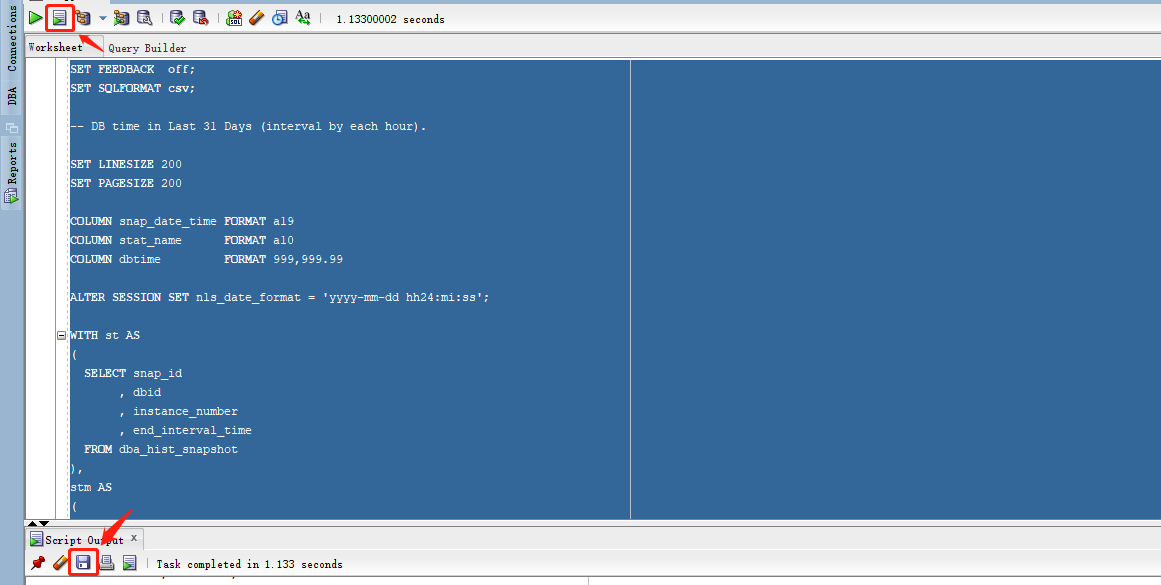
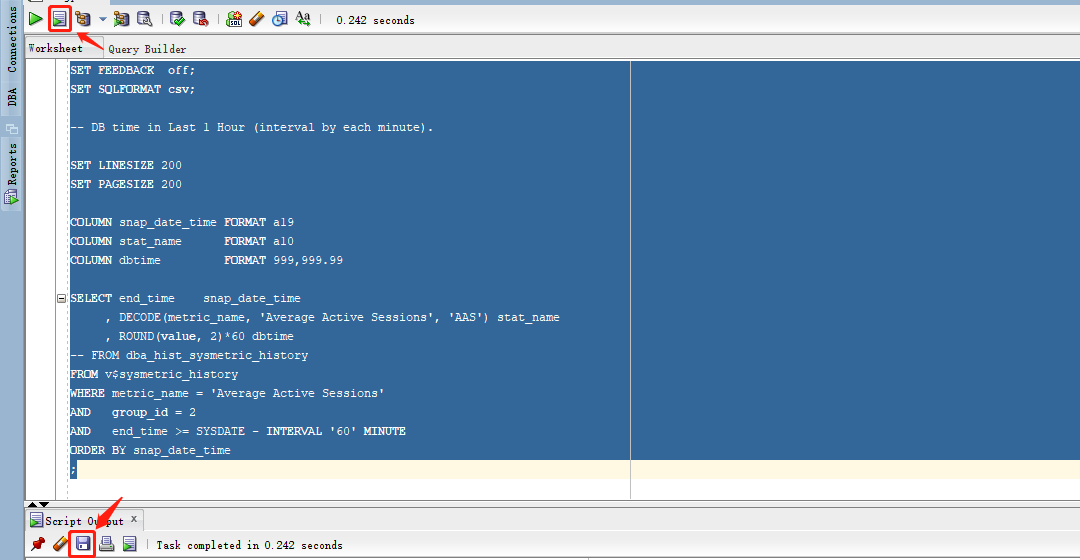
用将下面的两个db time的sql查询以脚本方式运行并保存为csv文件,详见具体的sql代码和对应的屏幕截图。
set feedback  off;
set sqlformat csv;
-- db time in last 31 days (interval by each hour).
set linesize 200
set pagesize 200
column snap_date_time format a19
column stat_name      format a10
column dbtime         format 999,999.99
alter session set nls_date_format = 'yyyy-mm-dd hh24:mi:ss';
with st as
(
  select snap_id
       , dbid
       , instance_number
       , end_interval_time
  from dba_hist_snapshot
),
stm as
(
  select snap_id
       , dbid
       , instance_number
       , stat_name
       , value
  from dba_hist_sys_time_model
  where stat_name = 'db time'
),
dbtime_per_hour as
(
  select cast(st.end_interval_time as date) snap_date_time
       , stm.stat_name
       , round((stm.value - lag(stm.value, 1, 0) over (partition by stm.dbid, stm.instance_number order by stm.snap_id))/1e6/6e1, 2) dbtime
  from st
     , stm
  where st.snap_id = stm.snap_id
  and   st.instance_number = stm.instance_number
  and   st.dbid = stm.dbid
  and   cast(st.end_interval_time as date) >= sysdate - 31
  order by snap_date_time
)
select snap_date_time  -- the group column
     , stat_name       -- the series column
     , dbtime          -- the value column
from dbtime_per_hour
where dbtime not in (select max(dbtime) from dbtime_per_hour)
;
set feedback  off;
set sqlformat csv;
-- db time in last 1 hour (interval by each minute).
set linesize 200
set pagesize 200
column snap_date_time format a19
column stat_name      format a10
column dbtime         format 999,999.99
select end_time    snap_date_time
     , decode(metric_name, 'average active sessions', 'aas') stat_name
     , round(value, 2)*60 dbtime
-- from dba_hist_sysmetric_history
from v$sysmetric_history
where metric_name = 'average active sessions'
and   group_id = 2
and   end_time >= sysdate - interval '60' minute
order by snap_date_time
;
将两个csv文件上传到服务器/home/dbadmin目录下
[dbadmin@test ~]$ ls -lrht
total 40k
drwxr-xr-x 5 dbadmin verticadba  134 dec 15 14:06 vdb_oracle_perf
-rw-r--r-- 1 dbadmin verticadba  27k dec 16 18:37 oracle_dbtime.csv    <<==
-rw-r--r-- 1 dbadmin verticadba 1.9k dec 16 18:37 oracle_dbtime_2.csv <<==用dbeaver 21.3.1客户端工具连接到vertica数据库

在dbeaver 21.3.1上创建两张表awr_dbtime和awr_dbtime_2
创建步骤分别详见如下两图:


将两个csv文件分别导入刚创建的两张表中
相应的屏幕截图如下所示:


用tableau可视化vertica数据库的表
- 用tableau连接vertica数据库
- 用tableau可视化表awr_dbtime_2(最近1小时,按每分钟间隔)
- 用tableau可视化表awr_dbtime(最近31天,按每小时间隔)
- 用tableau可视化表awr_dbtime(最近31天,按每天间隔)
用tableau连接vertica数据库
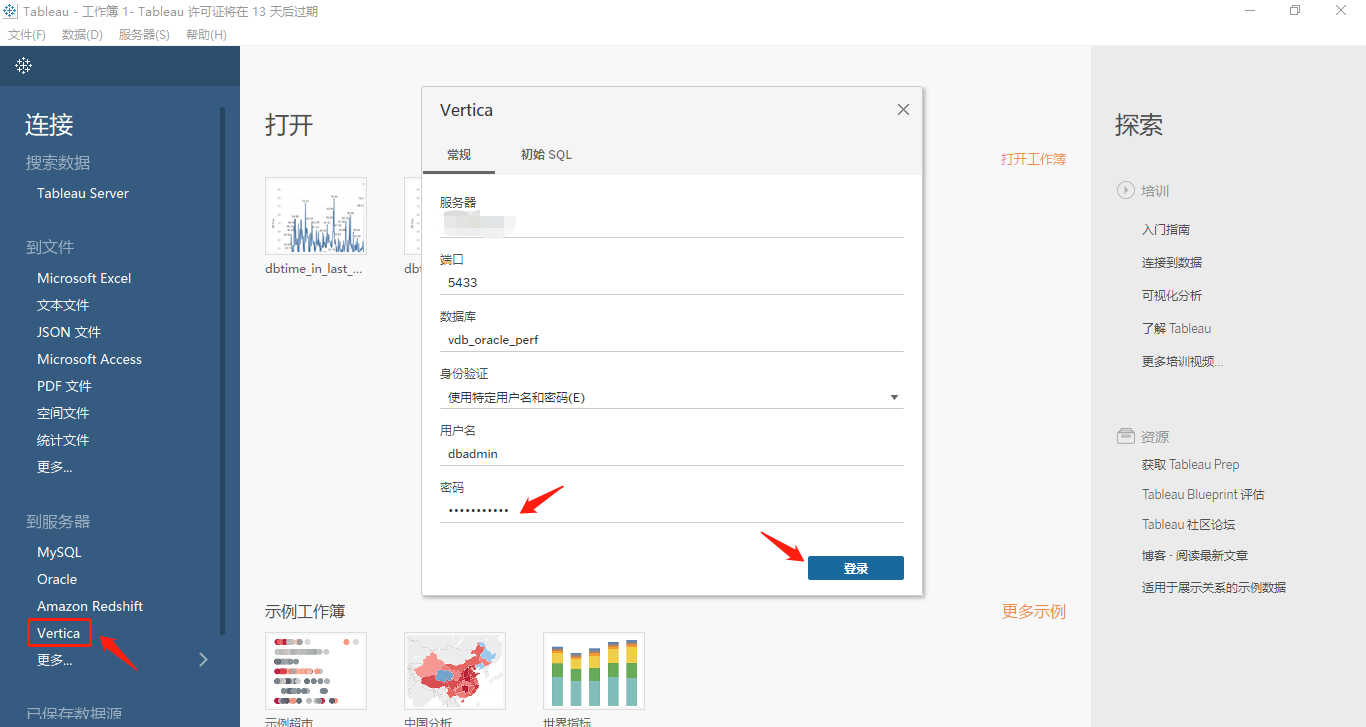
用tableau可视化表awr_dbtime_2(最近1小时,按每分钟间隔)
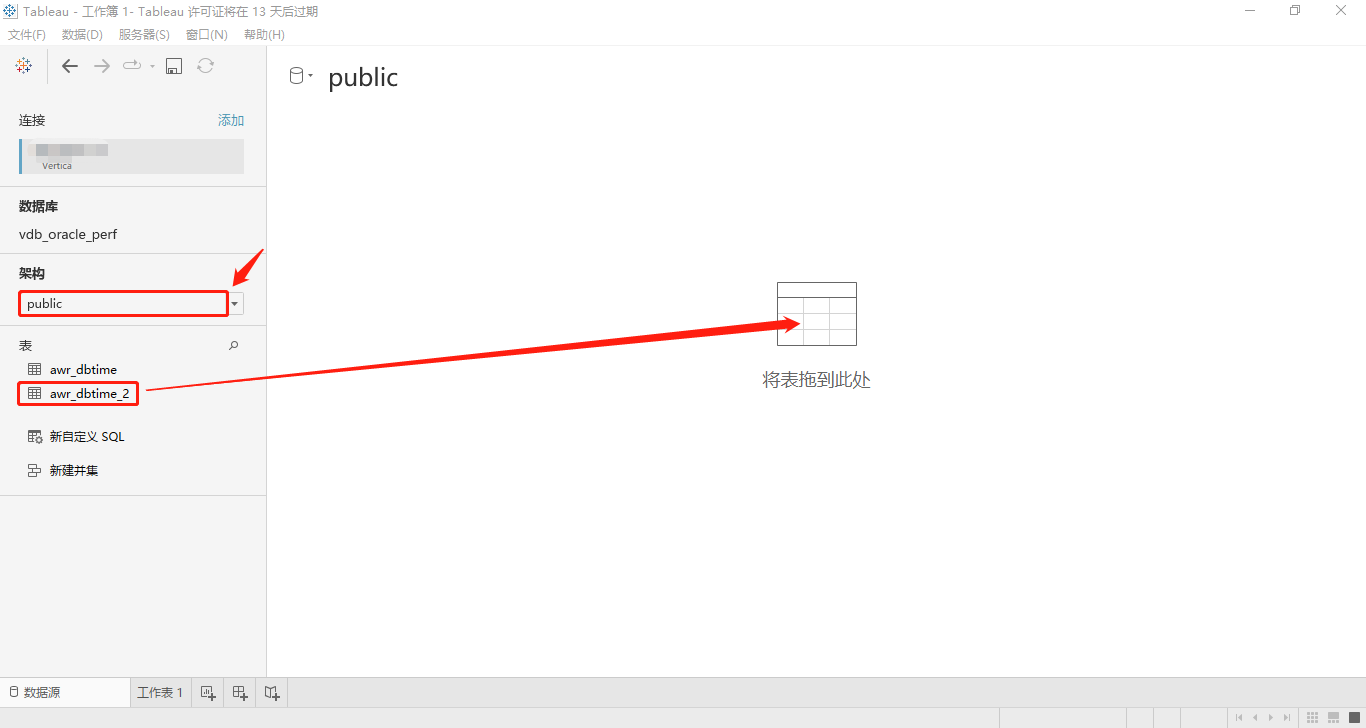
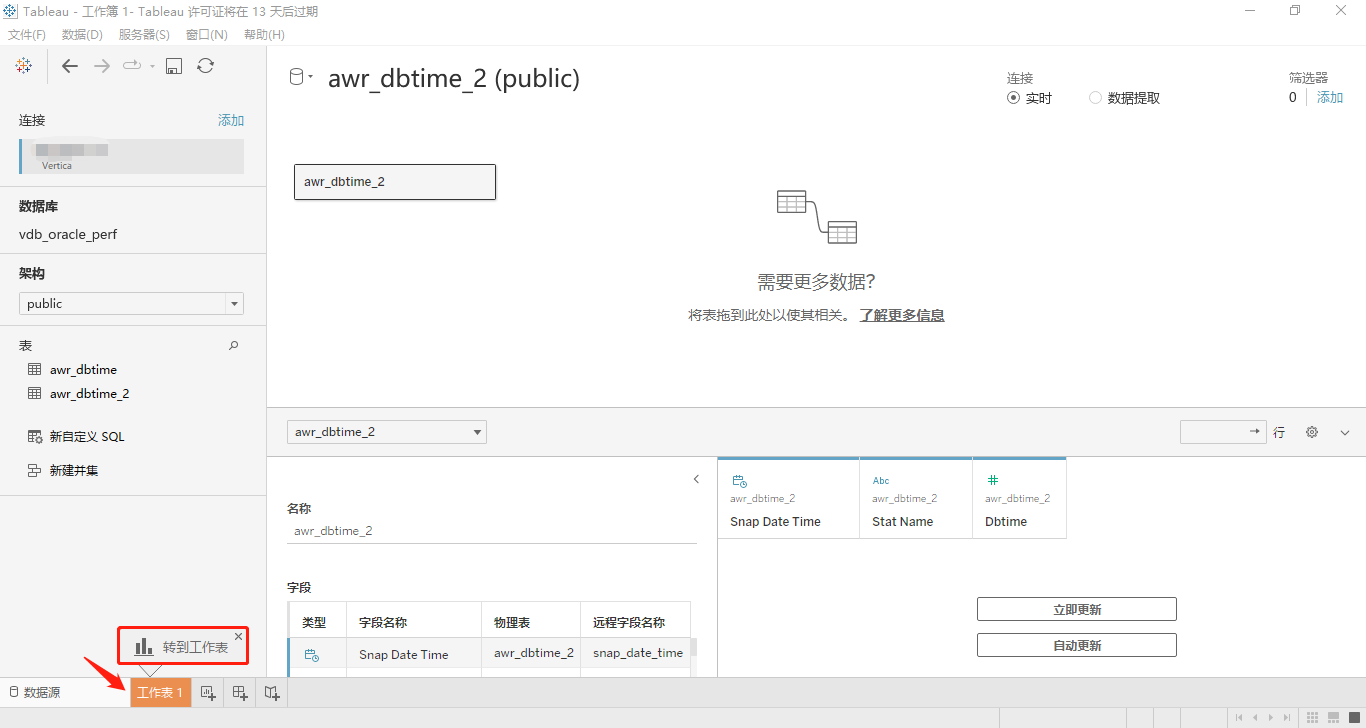
在连接成功vertica数据库以后,首先选择架构(这里翻译得可能有误,应该叫schema)public,然后将表awr_dbtime_2拖动到指定的位置,单击底部的“工作表1”,顺次见如下两图:
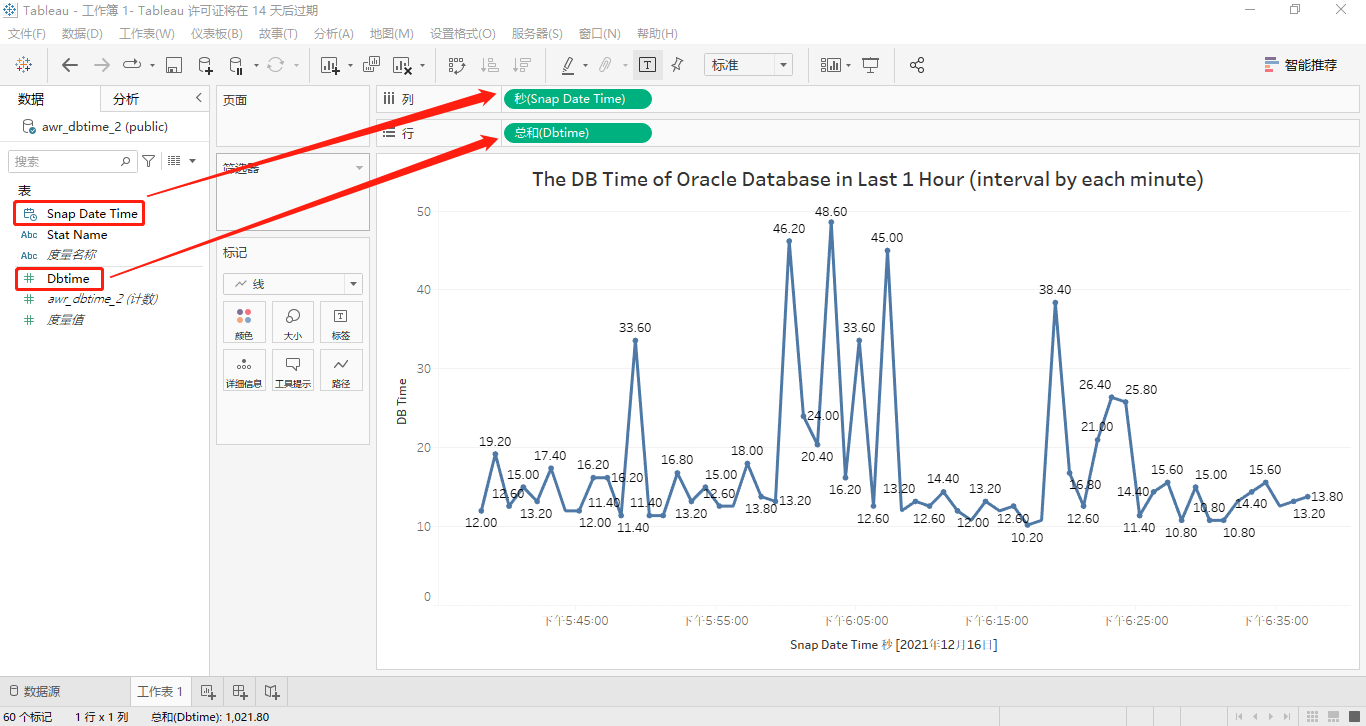
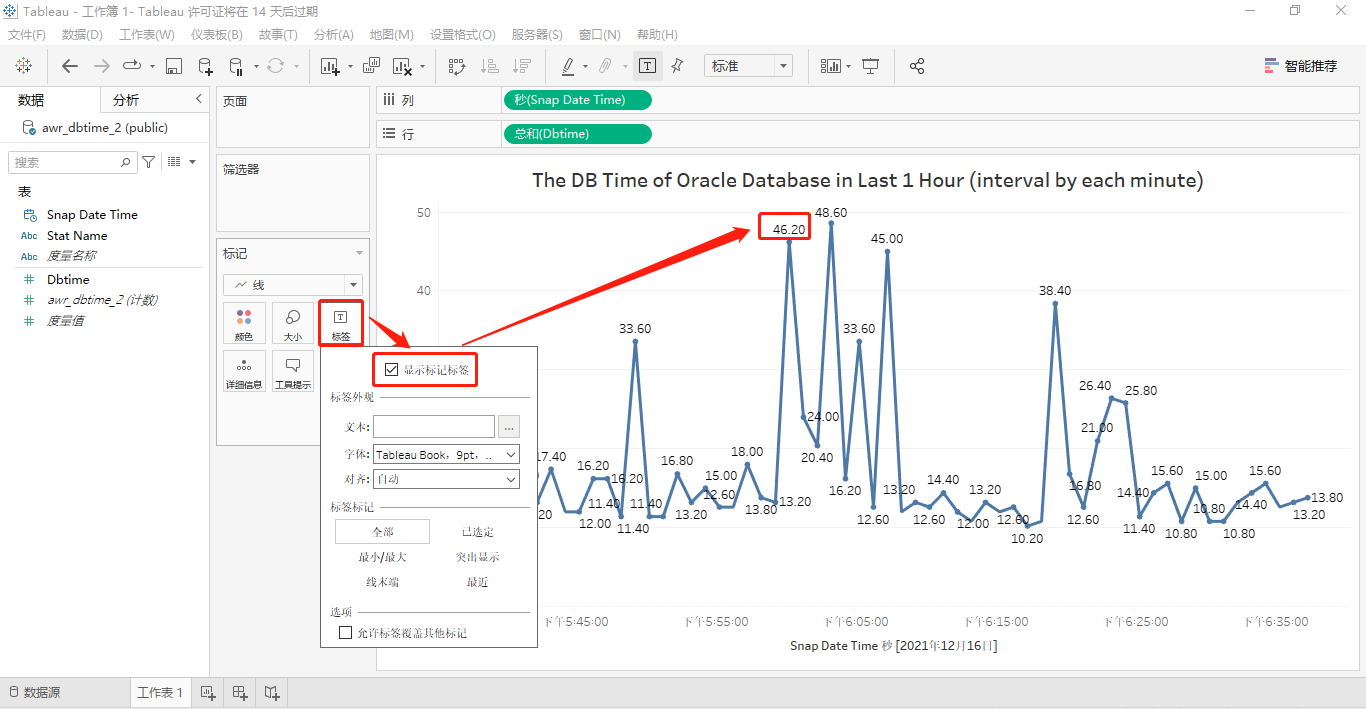
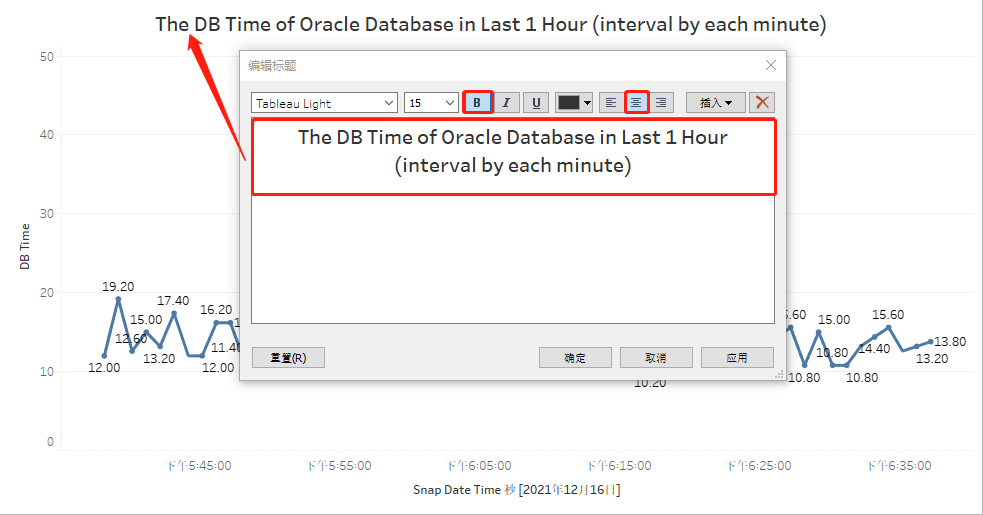
接着,我们按照简单的五个步骤来进行可视化表awr_dbtime_2,这个表里包含按每分钟间隔的最近1小时的db time取值。每个步骤的屏幕截图依次如下所示:
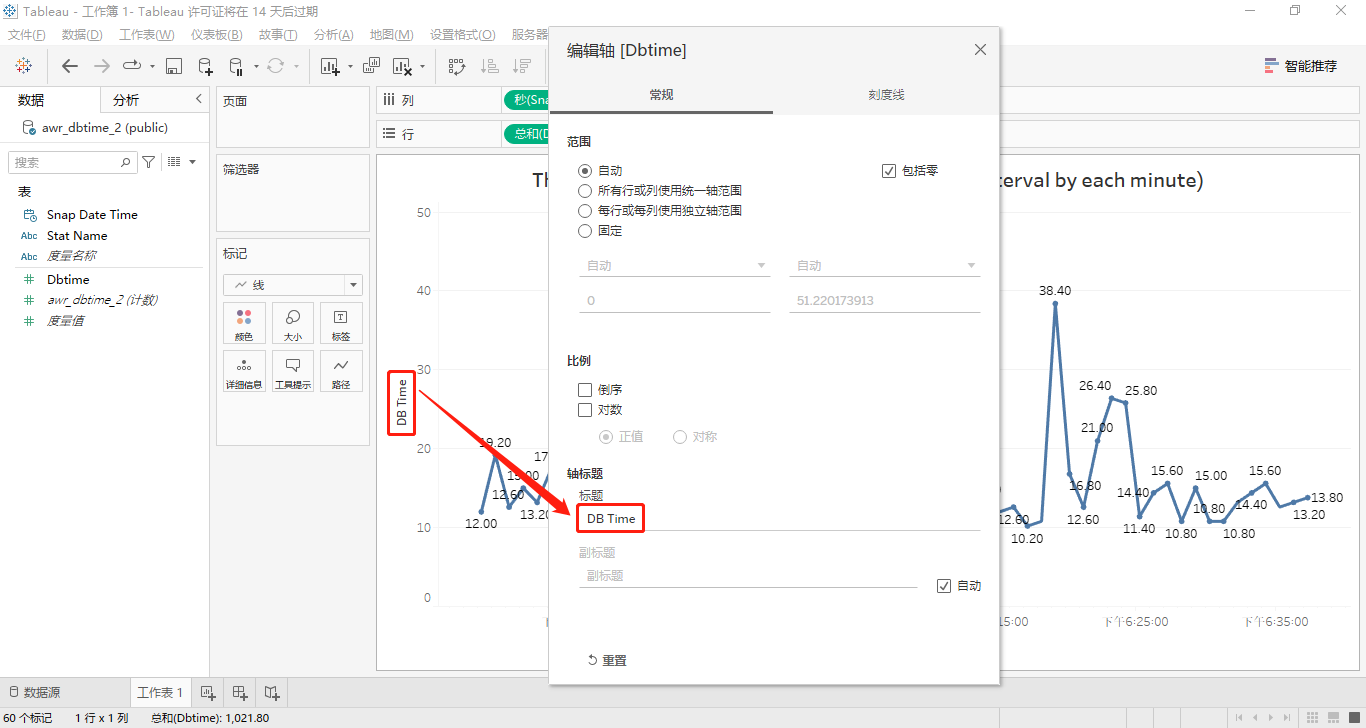
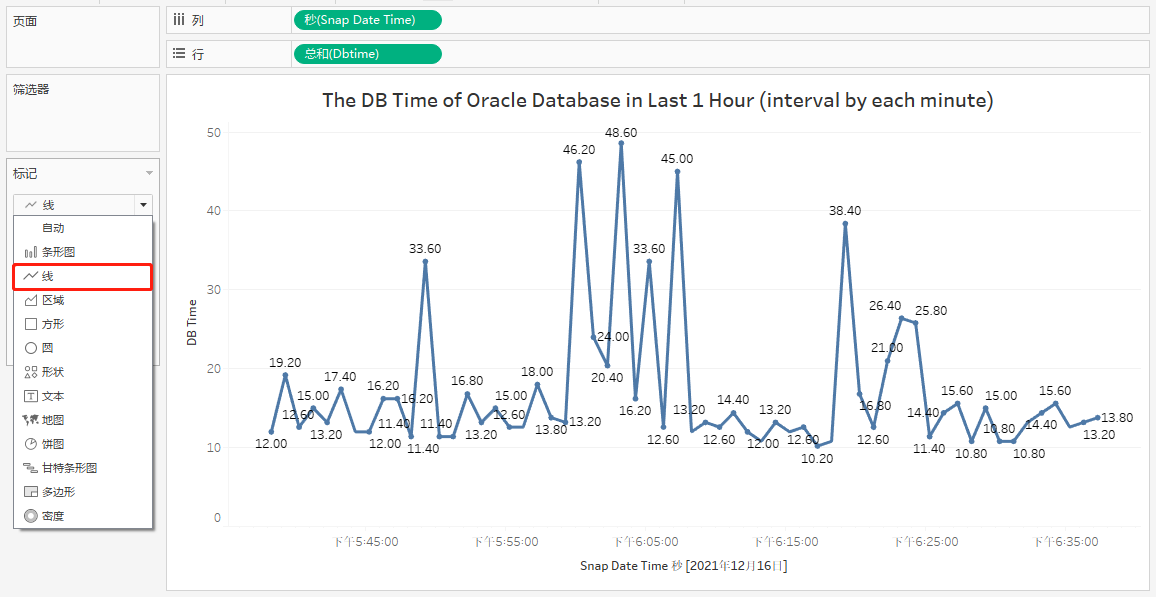
最后,我们用鼠标移动到一个对应的标签上面,它会显示具体的快照时间和db time取值,效果如下图:
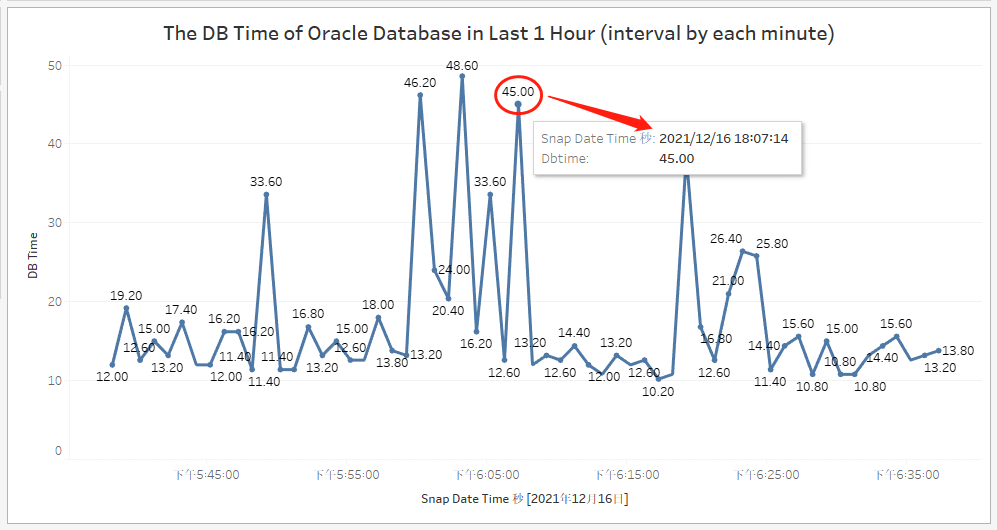
至此,最近1小时的db time(按每分钟间隔)的折线图已经制作完成。另外,tableau可以将其导出并保存为pdf或powerpoint格式的文件。
用tableau可视化表awr_dbtime(最近31天,按每小时间隔)
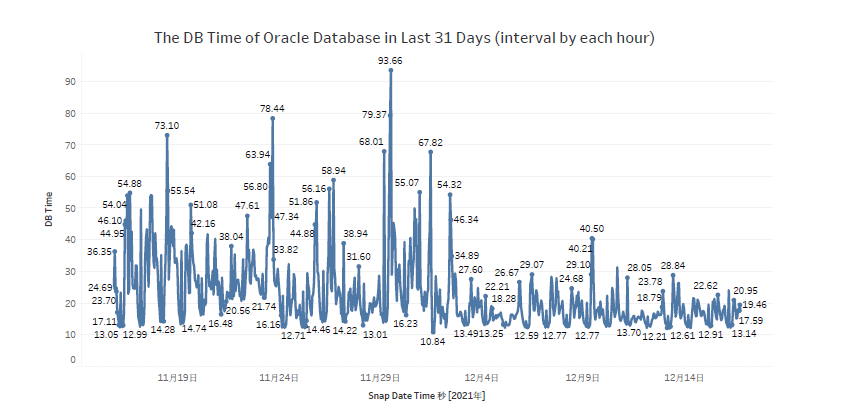
和前面的可视化表awr_dbtime_2的方法相同,在此省略一些设置步骤,直接附上最终的折线图。
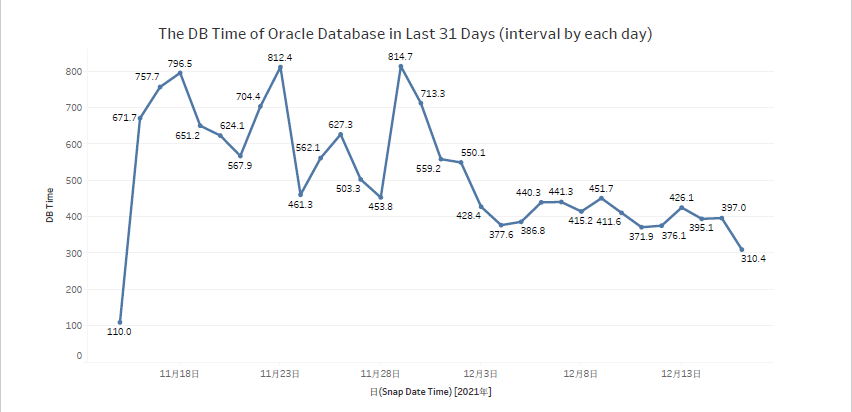
用tableau可视化表awr_dbtime(最近31天,按每天间隔)
同样的思路和方法,最终的效果图如下所示:
以上就是这篇博客文章的全部内容,欢迎朋友们在评论区提出您的宝贵意见或建议,我将认真阅您的反馈信息,并尽快逐一回复,谢谢!
参考内容
更新于 2021年12月18日 晚上:
您也可以在我的上找到如何和。

