目录
- 一、前言
- 二、安装前准备工作
- 1、硬件要求
- 2、软件要求
- 3、关闭透明页
- 4、配置主机名解析
- 5、创建所需的操作系统组和用户
- 6、配置oracle软件安装用户的资源限制
- 7、为linux配置内核参数
- 8、创建所需的软件目录并授权
- 9、关闭numa功能
- 10、禁用selinux
- 11、关闭防火墙
- 12、修改 /dev/shm大小
- 13、安装oracle数据库所需软件包
- 14、配置oracle软件所有者环境
- 15、重启操作系统
- 三、安装oracle数据库软件
- 四、配置监听
- 五、使用dbca创建数据库
- 1、启动数据库配置助手
- 2、创建数据库
- 3、创建模式
- 4、部署类型
- 5、数据库标识
- 6、存储选项
- 7、恢复区和归档配置
- 8、监听配置
- 9、数据库组件选择
- 10、初始化参数
- 11、管理选项
- 12、数据库凭证
- 13、创建选项
- 14、创建数据库
- 15、数据库创建完毕
- 六、数据库管理入门
- 1、启用sql*plus从命令行连接到数据库
- 2、查看数据库基础信息
- 3、查看数据库版本
- 4、查看数据库字符集
- 5、查看数据库块大小
- 6、实例的启动与关闭
- 7、取消180天密码过期限制
- 8、关闭审计
- 9、调整db_files
- 七、总结
- 八、写在后面
欢迎阅读本技术文档,本文将为您提供关于在red hat enterprise linux 7.6操作系统上安装oracle 19c数据库的详细过程。本文档旨在帮助您迅速、准确地完成安装配置过程,并确保数据库的正常运行。oracle 19c是一款功能强大且可靠的关系型数据库管理系统,在企业级应用中广泛使用。而red hat enterprise linux 7.6是一款经过全面测试和验证的稳定操作系统,提供出色的性能和安全性,成为许多企业部署数据库的首选。希望本文档能够为您提供有价值的信息,并使您能够成功安装和配置oracle 19c数据库。
1、硬件要求
1.1、内存要求
最低:1 gb 内存
建议:2 gb 或更多内存
[root@hellodba ~]# grep memtotal /proc/meminfo
memtotal:        2851844 kb
1.2、swap space
| ram | swap space |
|---|---|
| 在1gb到2gb之间 | ram大小的1.5倍 |
| 2gb到16gb之间 | 等于ram的大小 |
| 超过16gb | 等于16gb |
[root@hellodba ~]# grep swaptotal /proc/meminfo
swaptotal:       3170300 kb
1.3、automatic memory management
从oracle database 11g开始,自动内存管理功能需要更多的共享内存(/dev/shm)和文件描述符。在linux系统中,/dev/shm目录是一个特殊的目录,用于实现共享内存,默认是系统内存的50%。它是一个临时文件系统,通常位于ram(内存)中,而不是硬盘上,并且在系统重启时会被清空。因此,/dev/shm目录只适合用于短期存储和进程间通信,不能用于长期存储数据。/dev/shm大小应该大于sga pga的总内存大小,在linux系统上,如果操作系统 /dev/shm装载大小对于oracle系统全局区域(sga)和程序全局区域(pga)来说太小,则会导致ora-00845错误。
1.4、磁盘空间要求
目录/tmp至少有1gb空间,如果小于所需空间,请从目录中删除不必要的文件满足磁盘空间需求。
[root@hellodba ~]# df -h /tmp
filesystem size used avail use% mounted on
/dev/sda2 17g 4.8g 13g 29% /
| 安装类型 | 软件文件的磁盘空间要求(gb) |
|---|---|
| 企业版 | 7.2 |
| 标准版 | 7.2 |
[root@hellodba ~]# df -h /u01
filesystem      size  used avail use% mounted on
/dev/sdb1        50g  7.8g   43g  16% /u01
2、软件要求
2.1、适用于 linux x86-64 操作系统要求
//需要以下或更高版本的操作系统:
supported oracle linux 8 distributions for x86-64
supported oracle linux 7 distributions for x86-64
supported red hat enterprise linux 8 distributions for x86-64
supported red hat enterprise linux 7 distributions for x86-64
supported suse linux enterprise server 12 distributions for x86-64
supported suse linux enterprise server 15 distributions for x86-64
[root@hellodba ~]# cat /etc/redhat-release
red hat enterprise linux server release 7.6 (maipo)
2.2、适用于 linux x86-64 内核要求
oracle linux 8.1 with the unbreakable enterprise kernel 6: 5.4.17-2011.0.7.el8uek.x86_64 or later
oracle linux 8 with the red hat compatible kernel: 4.18.0-80.el8.x86_64 or later
oracle linux 7.4 with the unbreakable enterprise kernel 4: 4.1.12-124.19.2.el7uek.x86_64 or later
oracle linux 7.4 with the unbreakable enterprise kernel 5: 4.14.35-1818.1.6.el7uek.x86_64 or later
oracle linux 7.7 with the unbreakable enterprise kernel 6: 5.4.17-2011.4.4.el7uek.x86_64 or later
oracle linux 7.5 with the red hat compatible kernel: 3.10.0-862.11.6.el7.x86_64 or later
red hat enterprise linux 8: 4.18.0-80.el8.x86_64 or later
red hat enterprise linux 7.5: 3.10.0-862.11.6.el7.x86_64 or later
suse linux enterprise server 15: 4.12.14-23-default or later
suse linux enterprise server 12 sp3: 4.4.162-94.72-default or later
[root@hellodba ~]# uname -r
3.10.0-957.el7.x86_64
2.3、适用于 linux x86-64 的 oracle 数据库包要求
//packages for red hat enterprise linux 7
bc
binutils
compat-libcap1
compat-libstdc  -33
elfutils-libelf
elfutils-libelf-devel
fontconfig-devel
glibc
glibc-devel
ksh
libaio
libaio-devel
libx11
libxau
libxi
libxtst
libxrender
libxrender-devel
libgcc
libstdc
libstdc  -devel
libxcb
make
smartmontools
sysstat
gcc
gcc-c
gcc-info
gcc-locale
gcc48
gcc48-info
gcc48-locale
gcc48-c
3、关闭透明页
从red hat enterprise linux 6、oracle linux 6、suse 11和unbreakable enterprise kernel 2(uek2)内核开始,transparent hugepages在运行时默认启用。然而,透明的hugepages可能会导致内存分配延迟,因为内存是动态分配的。因此,甲骨文建议您在所有甲骨文数据库服务器上禁用透明hugepages,以避免性能问题。
//查看透明页是否启用,显示[always]表示transparent hugepages是启用的
[root@hellodba ~]# cat /sys/kernel/mm/transparent_hugepage/defrag
[always] madvise never
[root@hellodba ~]# cat /sys/kernel/mm/transparent_hugepage/enabled
[always] madvise never
//禁用透明页
[root@hellodba ~]# vi /etc/rc.d/rc.local
echo never > /sys/kernel/mm/transparent_hugepage/defrag
echo never > /sys/kernel/mm/transparent_hugepage/enabled
[root@hellodba ~]# chmod  x /etc/rc.d/rc.local
[root@hellodba ~]# reboot
//透明页已关闭
[root@hellodba ~]# cat /sys/kernel/mm/transparent_hugepage/defrag
always madvise [never]
[root@hellodba ~]# cat /sys/kernel/mm/transparent_hugepage/enabled
always madvise [never]
4、配置主机名解析
[root@hellodba ~]# echo "192.168.0.55 hellodba" >> /etc/hosts
[root@hellodba ~]# ping hellodba
ping hellodba (192.168.0.55) 56(84) bytes of data.
64 bytes from hellodb (192.168.0.55): icmp_seq=1 ttl=64 time=0.013 ms
5、创建所需的操作系统组和用户
[root@hellodba ~]# /usr/sbin/groupadd -g 54321 oinstall
[root@hellodba ~]# /usr/sbin/groupadd -g 54322 dba
[root@hellodba ~]# /usr/sbin/groupadd -g 54323 oper
[root@hellodba ~]# /usr/sbin/groupadd -g 54324 backupdba
[root@hellodba ~]# /usr/sbin/groupadd -g 54325 kmdba
[root@hellodba ~]# /usr/sbin/useradd  -u 54321 -g oinstall -g dba,oper,backupdba,kmdba oracle
[root@hellodba ~]# echo "hellodba" | passwd --stdin oracle
[root@hellodba ~]# id oracle
uid=54321(oracle) gid=54321(oinstall) 组=54321(oinstall),54322(dba),54323(oper),54324(backupdba),54325(kmdba)
6、配置oracle软件安装用户的资源限制
[root@hellodba ~]# vi /etc/security/limits.conf
#oracle setting
#打开文件描述符大小
oracle soft nproc 16384
oracle hard nproc 16384
#单个用户可用的进程数
oracle soft nofile 16384
oracle hard nofile 65536
#进程堆栈段的大小
oracle soft stack 10240
oracle hard stack 32768
7、为linux配置内核参数
在oracle数据库安装期间,可以生成并运行修复脚本,以检查和设置成功安装数据库所需的内核参数值。建议手动预先修改好。
[root@hellodba ~]# vi /etc/sysctl.conf
#oracle setting
#可以拥有的异步io请求数
fs.aio-max-nr = 1048576
#允许文件句柄的最大数目
fs.file-max = 6815744
#信号参数
kernel.sem = 250 32000 100 128
#ip v4的端口范围
net.ipv4.ip_local_port_range = 9000 65500
#缓存区的缺省值
net.core.rmem_default = 262144
#缓存区的最大值
net.core.rmem_max = 4194304
#发送缓存区的缺省值
net.core.wmem_default = 262144
#发送缓存区的最大值
net.core.wmem_max = 1048586
#当系统检测到oops时,重新启动系统,以便系统能够重新初始化恢复正常工作
kernel.panic_on_oops = 1
#单个共享内存段最大值,让数据库在一个共享段里面的可以容纳整个sga
#最大值:比物理内存小1字节
#(kernel.shmmax = 物理内存*1024*1024*1024-1)
kernel.shmmax = 2684354560
#控制共享内存页数(kernel.shmall = shmmax/4096)
kernel.shmall = 655360
#共享内存的最大数量
kernel.shmmni = 4096
#当系统内存使用90%的时候开始使用交换页面
vm.swappiness=10
#默认是100,增大这个参数设置了虚拟内存回收directory和i-node缓冲的倾向,这个值越大。越容易回收。
vm.vfs_cache_pressure=200
8、创建所需的软件目录并授权
//oracle base directory
[root@hellodba ~]# mkdir -p /u01/app/oracle
//oracle inventory directory
[root@hellodba ~]# mkdir -p /u01/app/orainventory
//oracle home directory
[root@hellodba ~]# mkdir -p /u01/app/oracle/product/19.0.0/dbhome_1
//oracle soft
[root@hellodba ~]# mkdir -p /soft
[root@hellodba ~]# chown -r oracle:oinstall /u01
[root@hellodba ~]# chown -r oracle:oinstall /soft
[root@hellodba ~]# chmod -r 775 /u01
[root@hellodba ~]# chmod -r 775 /soft
9、关闭numa功能
//numa关闭前
[root@hellodba ~]#  dmesg | grep -i numa
[    0.000000] numa: node 0 [mem 0x00000000-0x0009ffff]   [mem 0x00100000-0xbfffffff] -> [mem 0x00000000-0xbfffffff]
[    0.000000] numa: node 0 [mem 0x00000000-0xbfffffff]   [mem 0x100000000-0x1017fffff] -> [mem 0x00000000-0x1017fffff]
//关闭numa
[root@hellodba ~]# vi /etc/default/grub
将 grub_cmdline_linux="crashkernel=auto rhgb quiet"
改 grub_cmdline_linux="crashkernel=auto rhgb quiet numa=off"
[root@hellodba ~]# grub2-mkconfig -o /etc/grub2.cfg
[root@hellodba ~]# reboot
//numa关闭后
[root@hellodba ~]# dmesg | grep -i numa
[    0.000000] command line: boot_image=/boot/vmlinuz-3.10.0-957.el7.x86_64 root=uuid=cacc2dc0-9441-473d-ad25-dad067800baa ro crashkernel=auto rhgb quiet numa=off
[    0.000000] numa turned off
[    0.000000] kernel command line: boot_image=/boot/vmlinuz-3.10.0-957.el7.x86_64 root=uuid=cacc2dc0-9441-473d-ad25-dad067800baa ro crashkernel=auto rhgb quiet numa=off
10、禁用selinux
[root@hellodba ~]# getenforce
enforcing
[root@hellodba ~]# vi /etc/selinux/config
将 selinux=enforcing
改 selinux= disabled
[root@hellodba ~]# setenforce 0
[root@hellodba ~]# getenforce
permissive
11、关闭防火墙
//关闭防火墙
[root@hellodba ~]# systemctl stop firewalld
//查看防火墙状态
[root@hellodba ~]# systemctl status firewalld
//禁止防火墙开机自启动
[root@hellodba ~]# systemctl disable firewalld
12、修改 /dev/shm大小
[root@hellodba ~]# echo "none /dev/shm tmpfs defaults,size=3096m 0 0" >> /etc/fstab
[root@hellodba ~]# mount -o remount /dev/shm
[root@hellodba ~]# df -h /dev/shm
文件系统        容量  已用  可用 已用% 挂载点
tmpfs           3.1g     0  3.1g    0% /dev/shm
13、安装oracle数据库所需软件包
13.1、配置yum源
[root@hellodba ~]# mount /dev/cdrom /mnt
[root@hellodba ~]# cd /etc/yum.repos.d
[root@hellodba yum.repos.d]# rm -rf *.repo
[root@hellodba yum.repos.d]# echo "[el]" >> hellodba.repo
[root@hellodba yum.repos.d]# echo "name=linux 7.6 dvd" >> hellodba.repo
[root@hellodba yum.repos.d]# echo "baseurl=file:///mnt" >> hellodba.repo
[root@hellodba yum.repos.d]# echo "gpgcheck=0" >> hellodba.repo
[root@hellodba yum.repos.d]# echo "enabled=1" >> hellodba.repo
13.2、安装必要的软件包
[root@hellodba ~]#
 yum -y install bc*
yum -y install binutils*
yum -y install compat-libcap1*
yum -y install compat-libstdc  -33*
yum -y install elfutils-libelf*
yum -y install elfutils-libelf-devel*
yum -y install fontconfig-devel*
yum -y install glibc*
yum -y install glibc-devel*
yum -y install ksh*
yum -y install libaio*
yum -y install libaio-devel*
yum -y install libx11*
yum -y install libxau*
yum -y install libxi*
yum -y install libxtst*
yum -y install libxrender*
yum -y install libxrender-devel*
yum -y install libgcc*
yum -y install libstdc  *
yum -y install libstdc  -devel*
yum -y install libxcb*
yum -y install make*
yum -y install smartmontools*
yum -y install sysstat*
yum -y install gcc*
14、配置oracle软件所有者环境
[root@hellodba ~]# su - oracle
[oracle@hellodba ~]$ vi ~/.bash_profile
umask=022
export ps1
export tmp=/tmp
export lang=en_us.utf8
export tmpdir=$tmp
export oracle_unqname=hellodb
export oracle_sid=hellodb;
export oracle_base=/u01/app/oracle;
export oracle_home=$oracle_base/product/19.0.0/dbhome_1;
export oracle_term=xterm;
export nls_date_format="yyyy-mm-dd hh24:mi:ss";
export nls_lang=american_america.utf-8;
export path=.:$path:$home/.local/bin:$home/bin:$oracle_home/bin;
export threads_flag=native;
[oracle@hellodba ~]$ source ~/.bash_profile
15、重启操作系统
[root@hellodba ~]# reboot
1、上传oracle数据库安装软件到服务器并解压
//通过oracle用户上传oracle数据库安装软件到服务器 /soft 目录
[root@hellodba ~]# su - oracle
[oracle@hellodba ~]$ cd $oracle_home
[oracle@hellodba dbhome_1]$ unzip -q /soft/linux.x64_193000_db_home.zip
2、安装数据库软件
[oracle@hellodba ~]$ cd $oracle_home
[oracle@hellodba dbhome_1]$ ./runinstaller
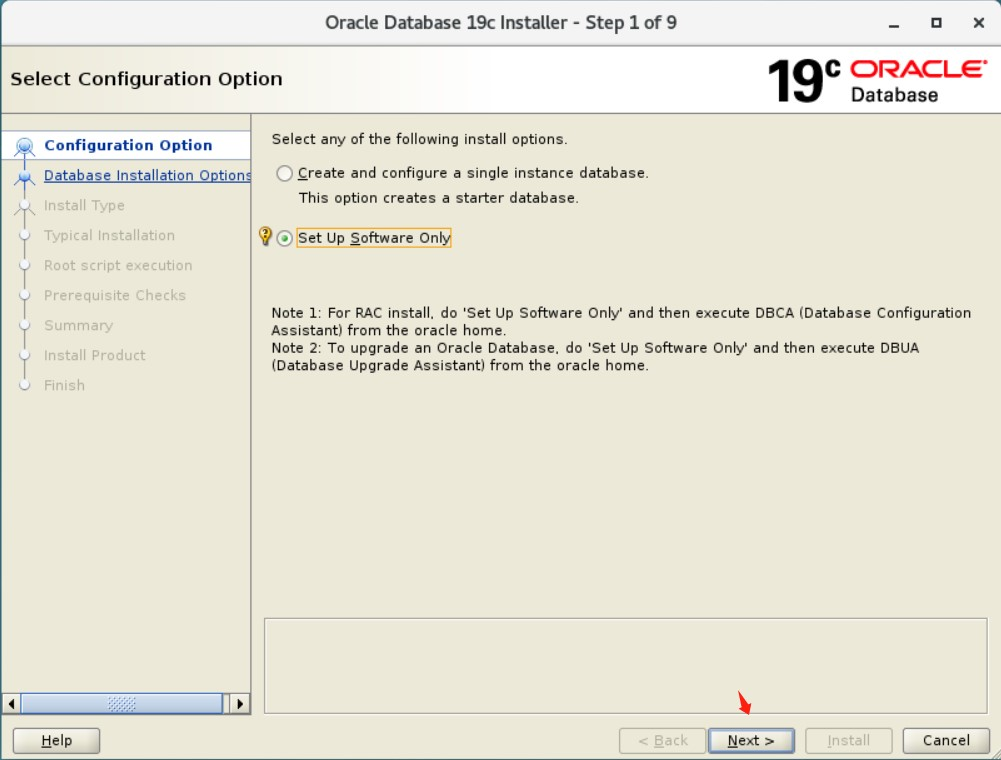
2.1、配置选项
仅安装数据库软件。
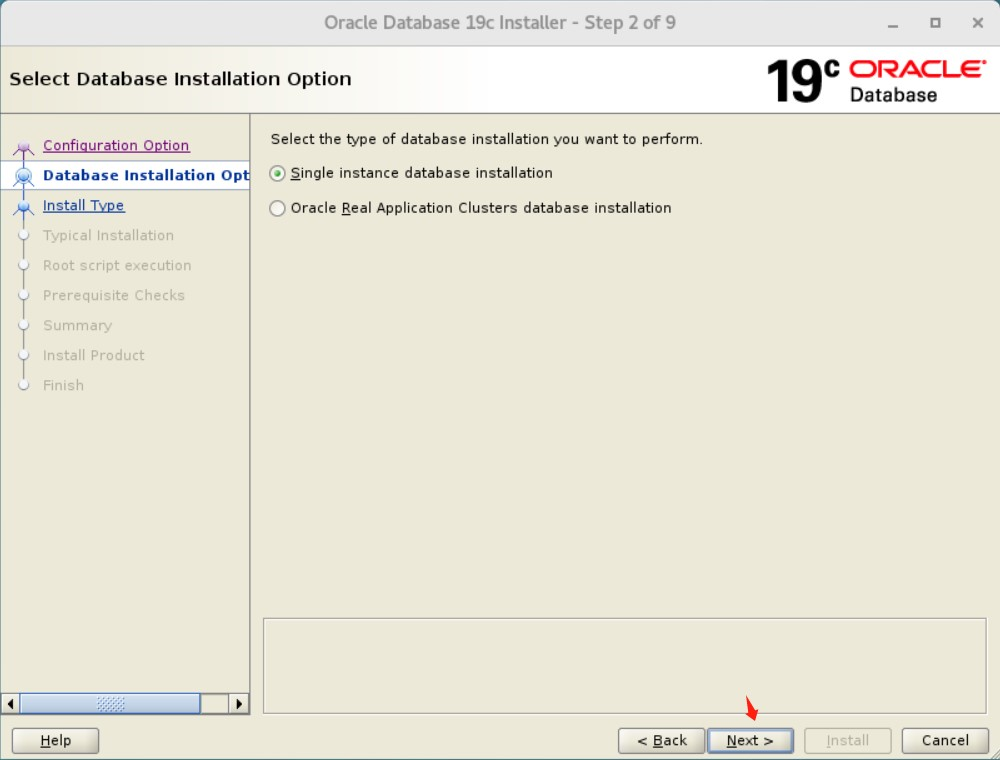
2.2、数据库安装选项
单实例数据库安装。
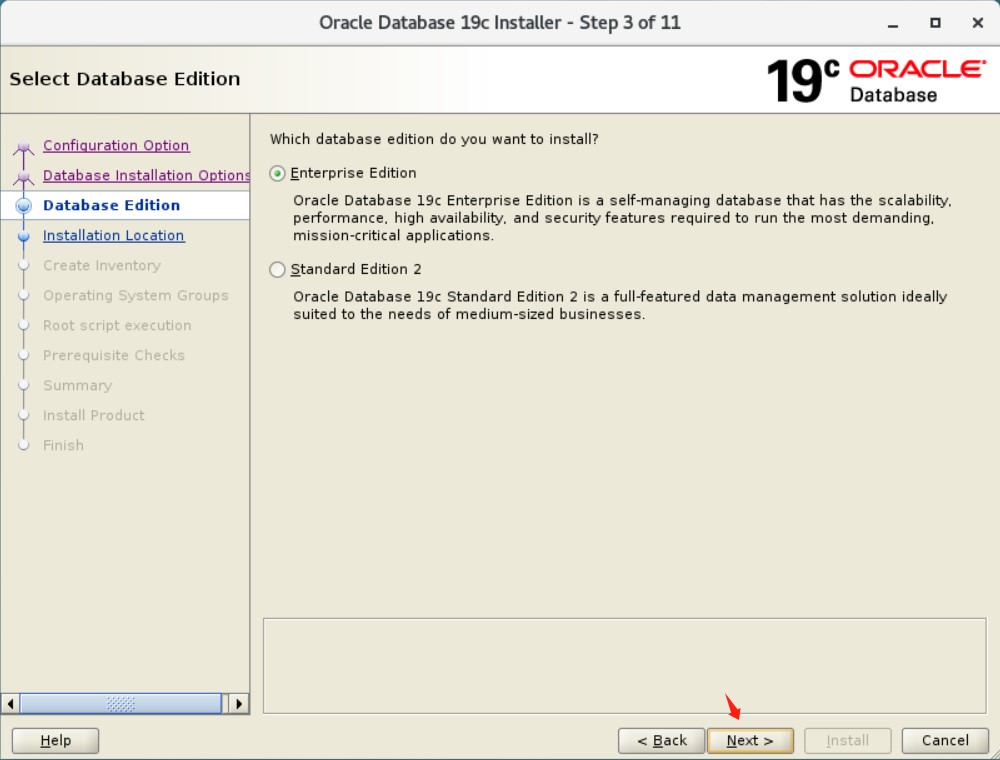
2.3、选择数据库版本
选择企业版、标准版或标准版,单击下一步。
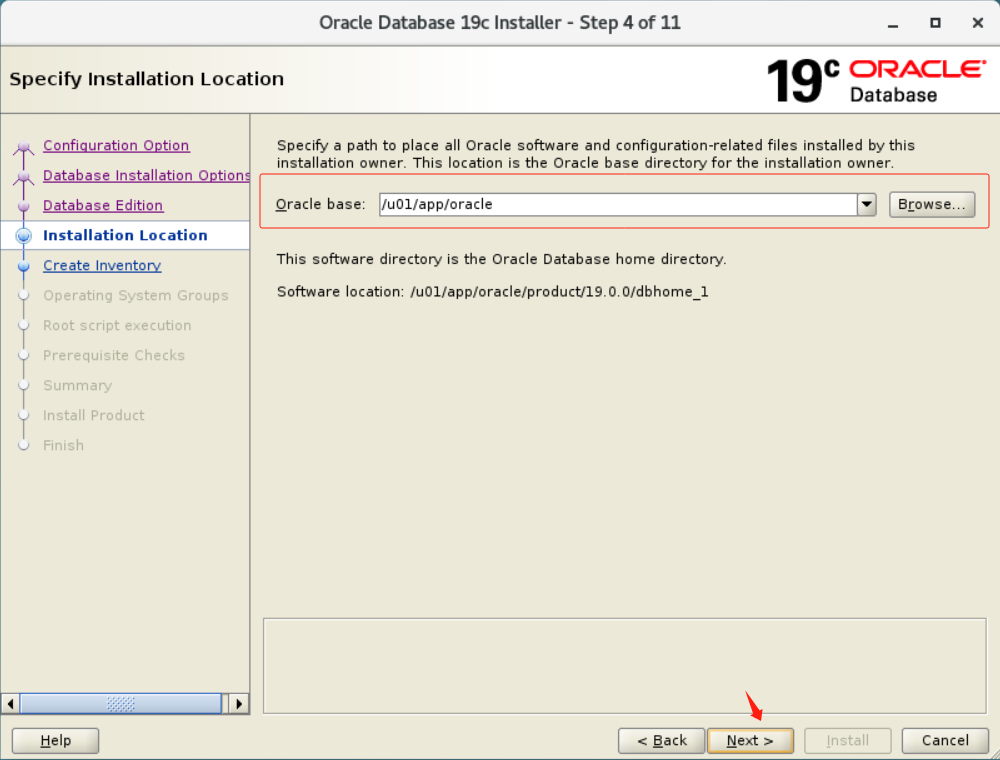
2.4、指定安装位置
默认情况下显示 oracle 基本路径。您可以根据需要更改此路径。指定 oracle 基本数据库、软件位置,然后单击下一步。
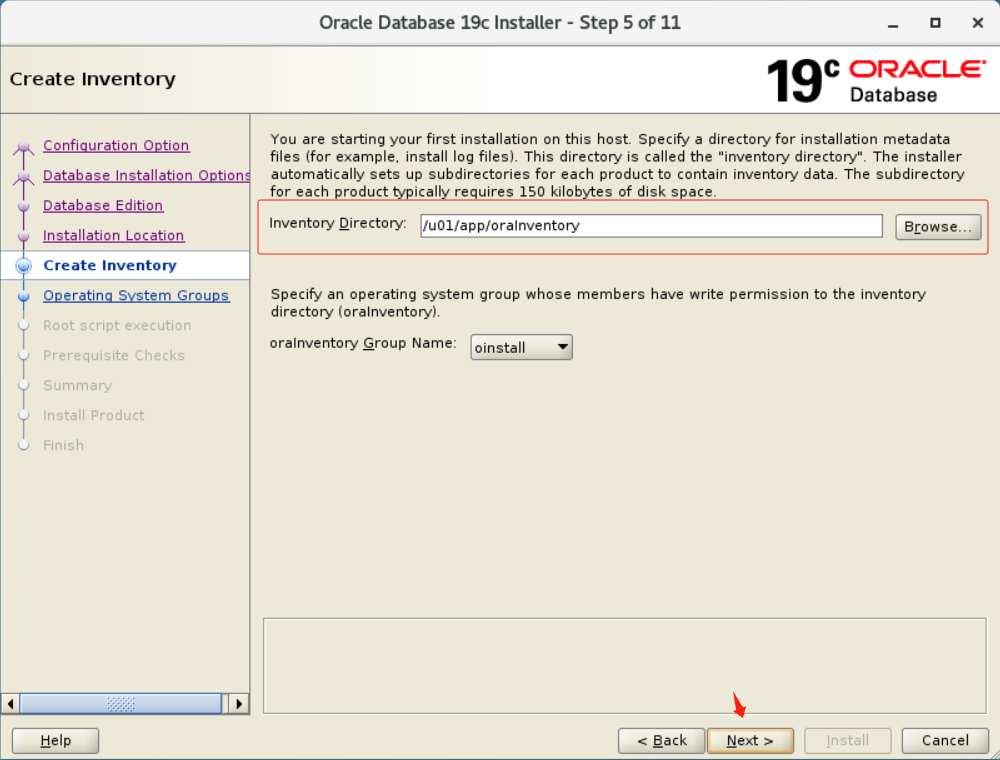
2.5、指定oracle安装清单目录
默认情况下显示 oracle inventory directory 基本路径。您可以根据需要更改此路径。
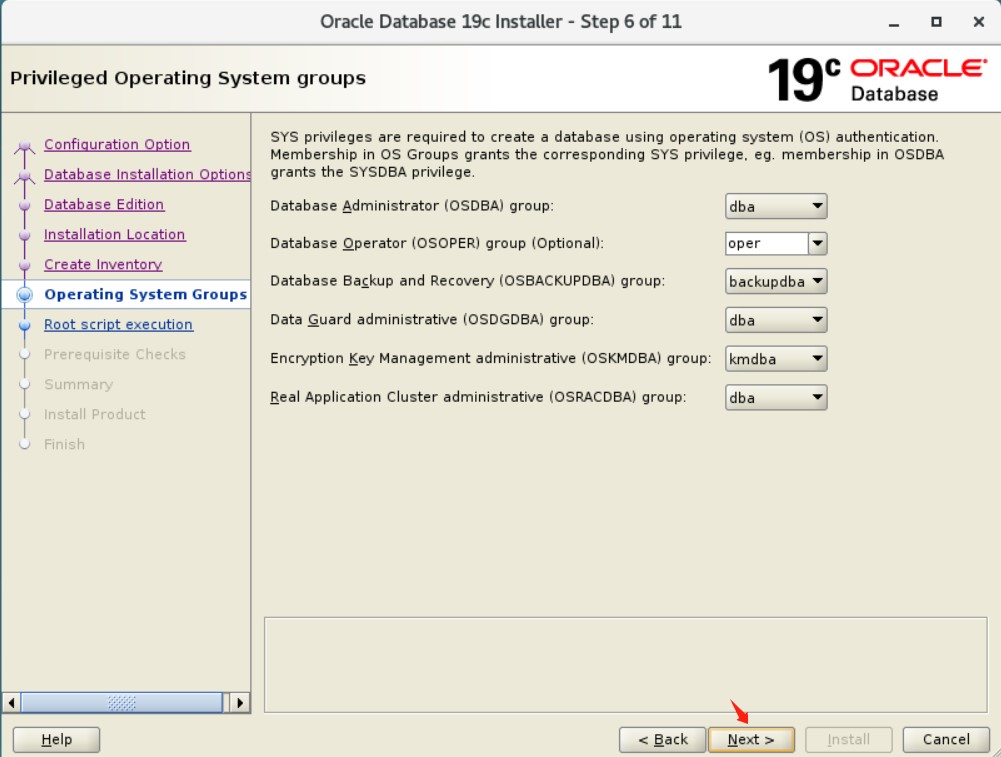
2.6、操作系统组选择
默认情况下,操作系统组处于选中状态。您也可以手动选择。
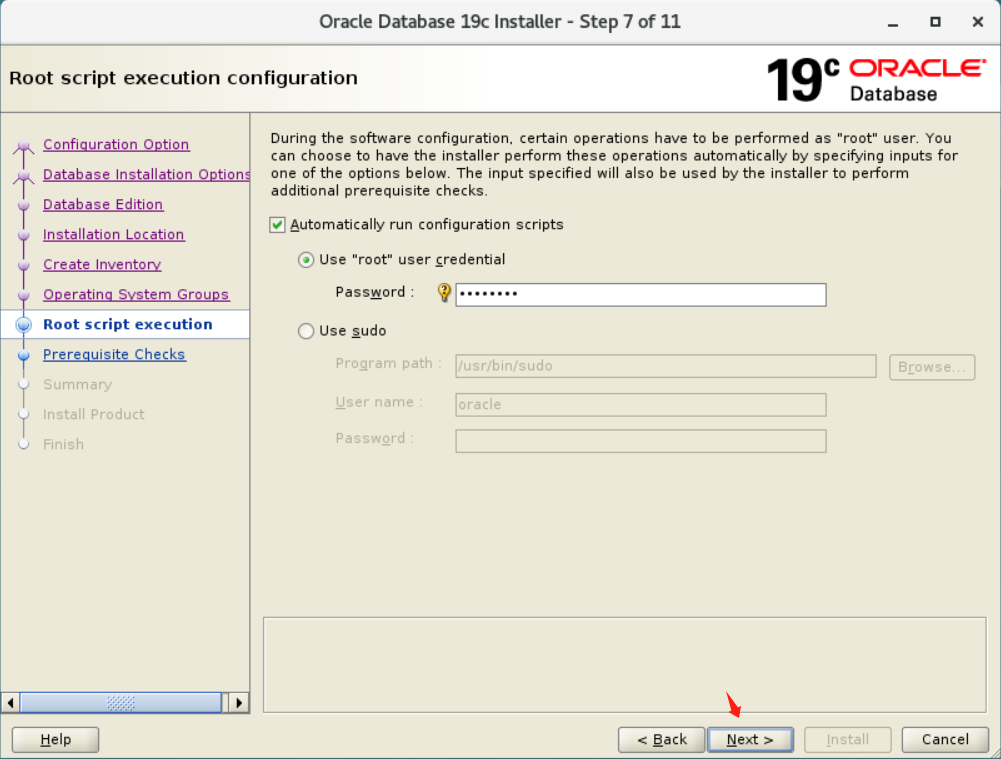
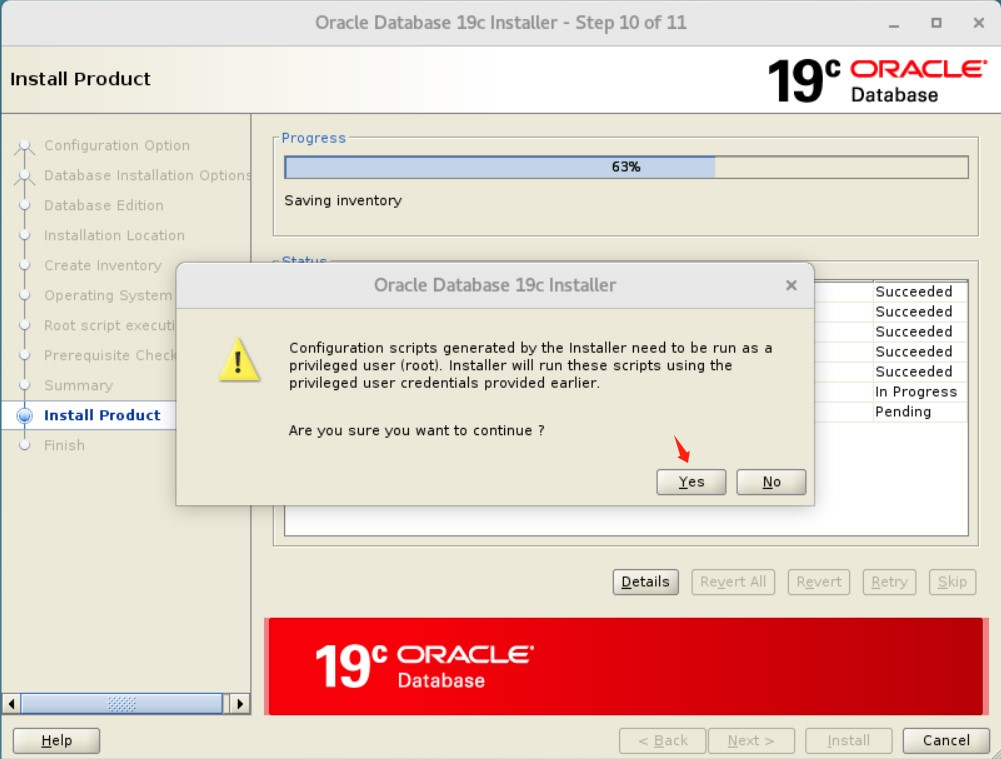
2.7、执行脚本选择
在软件配置过程中,某些操作必须以root用户执行,再次可以选择让安装程序自动执行这些操作。
此处采用自动执行脚本。
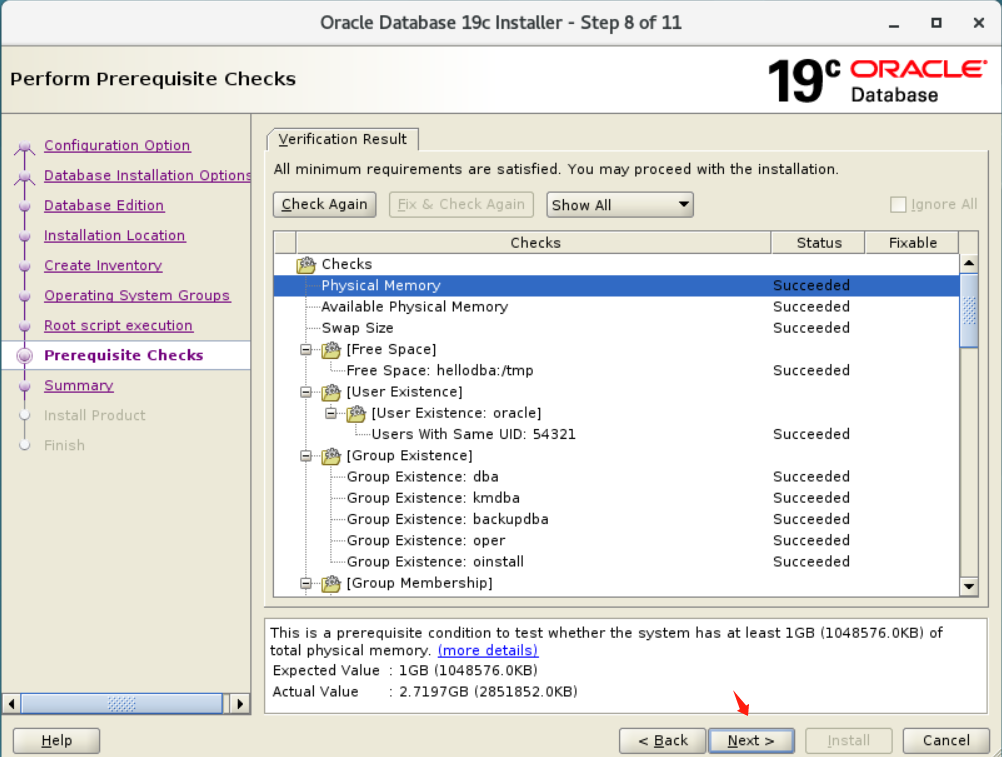
2.8、先决条件检查
此选项验证是否满足执行数据库安装的最低系统要求。
注意:“修复并再次检查”选项会生成一个脚本,您必须以用户身份运行该脚本。此生成的脚本将某些系统参数设置为 oracle 建议的值。
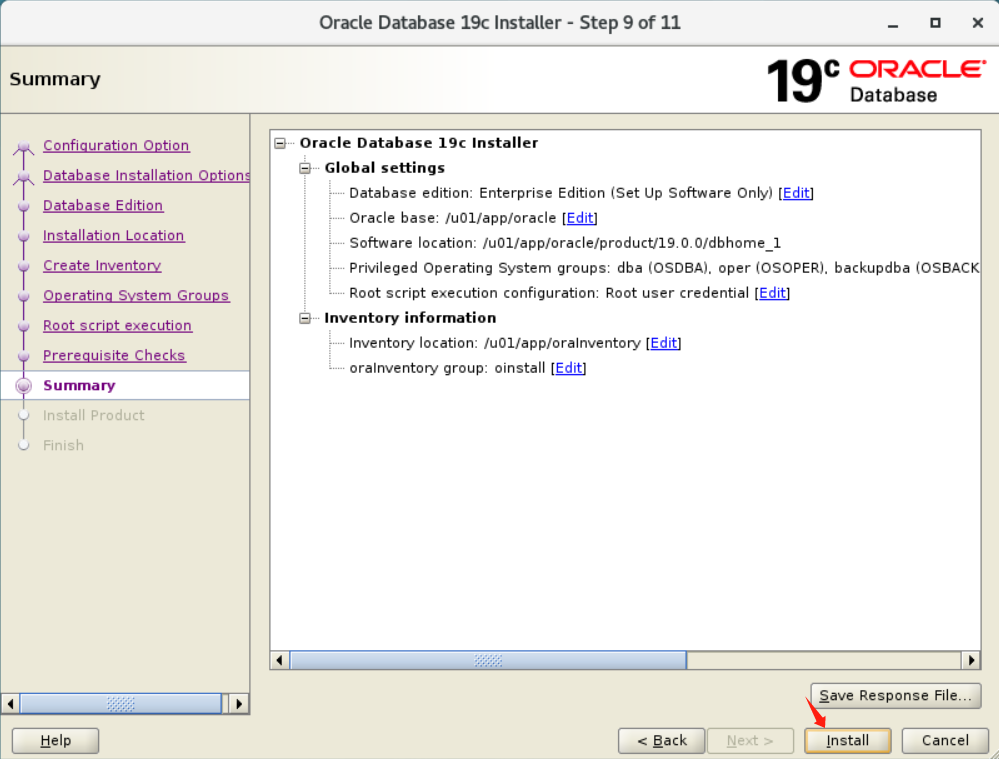
2.9、执行安装
注意:从 oracle 数据库 11g release 2 (11.2) 开始,您可以通过单击保存响应文件将所有安装步骤保存到响应文件中。稍后,此文件可用于静默安装。
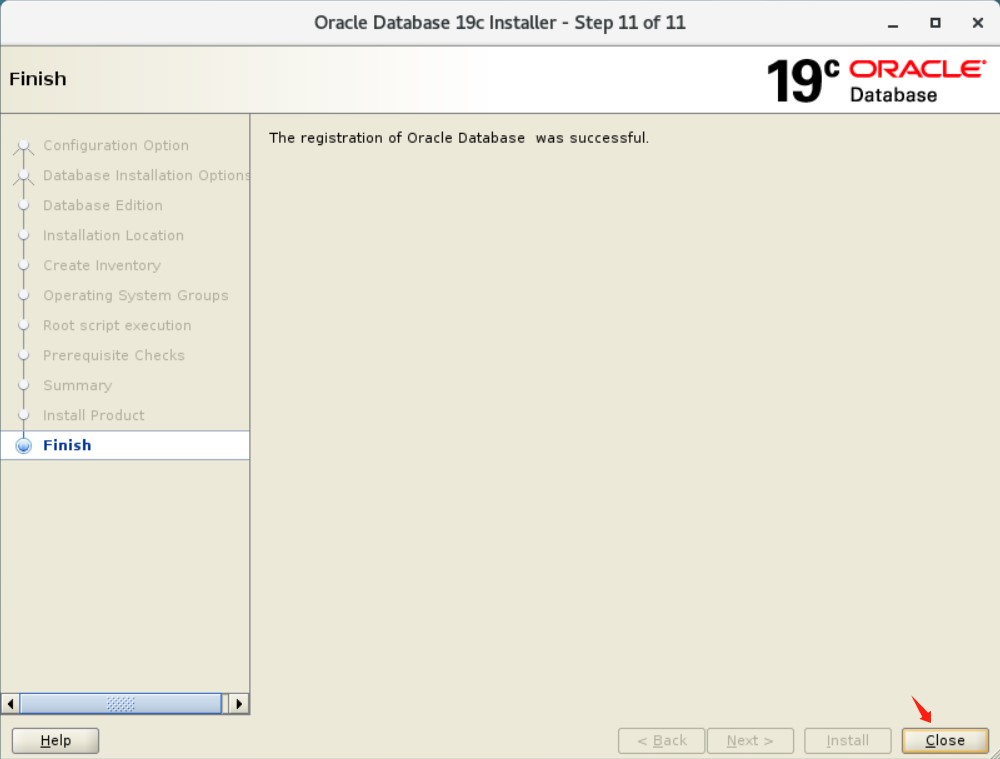
2.10、数据库软件安装完成
单击“close”结束安装,并退出安装程序。
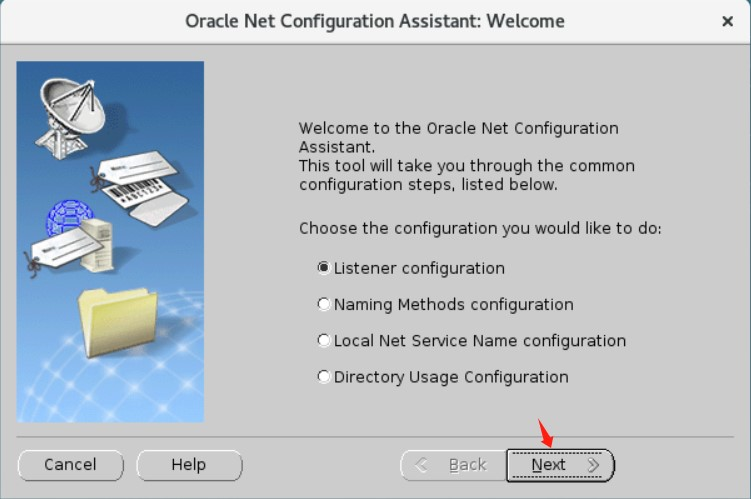
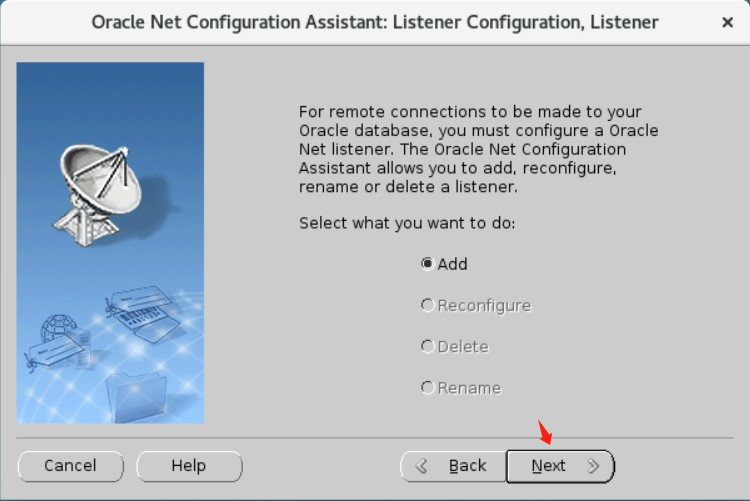
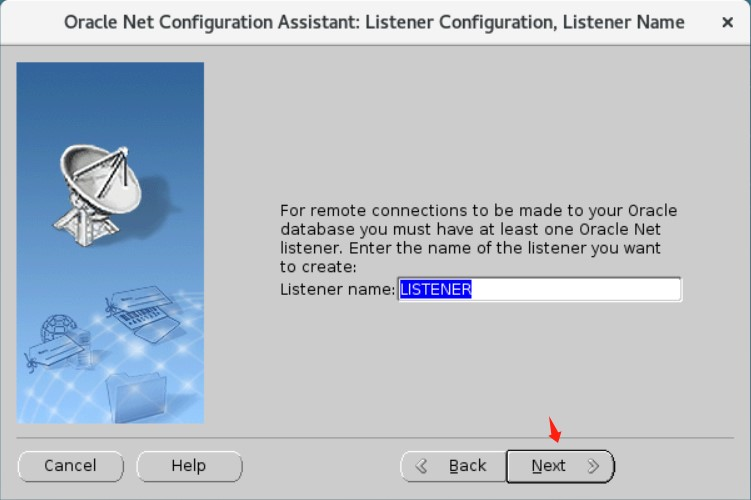
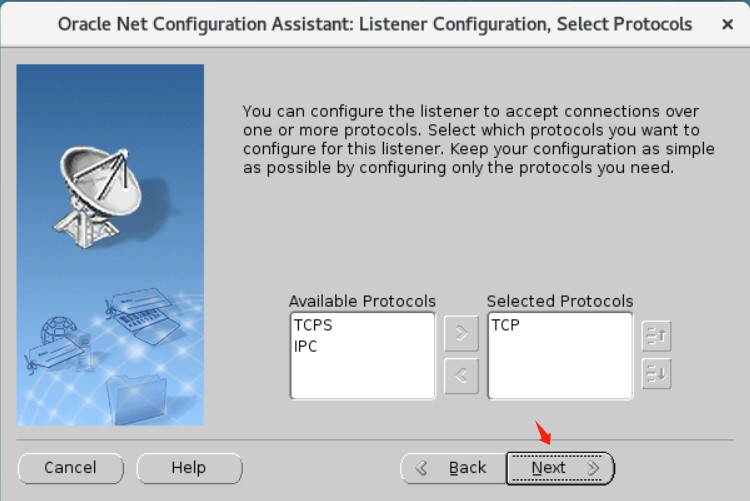
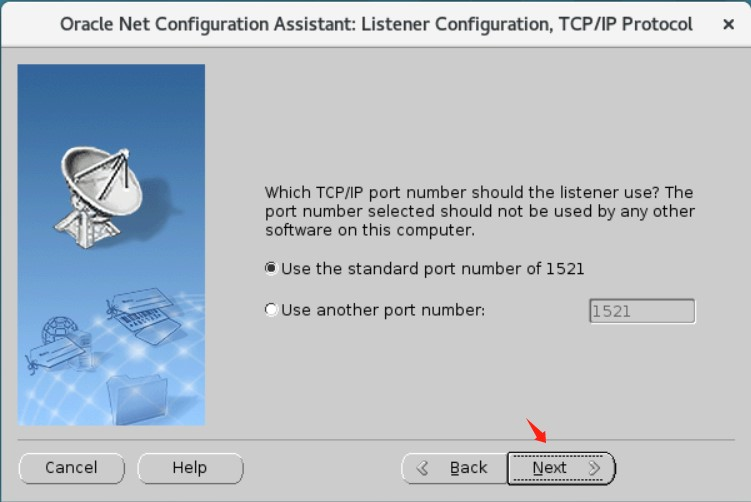
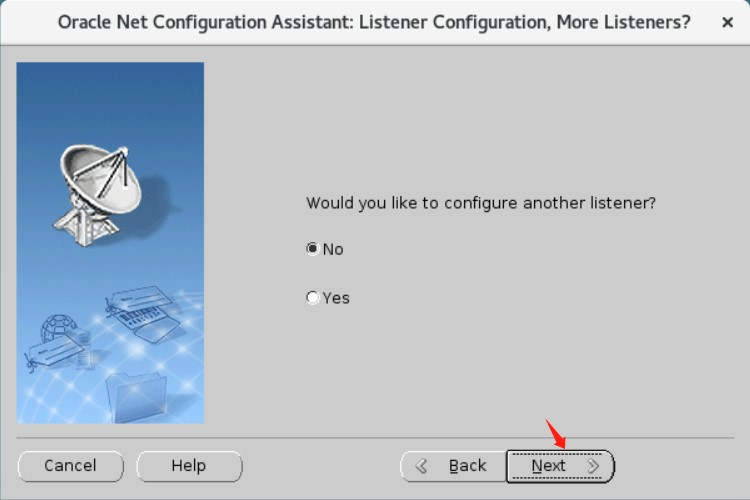
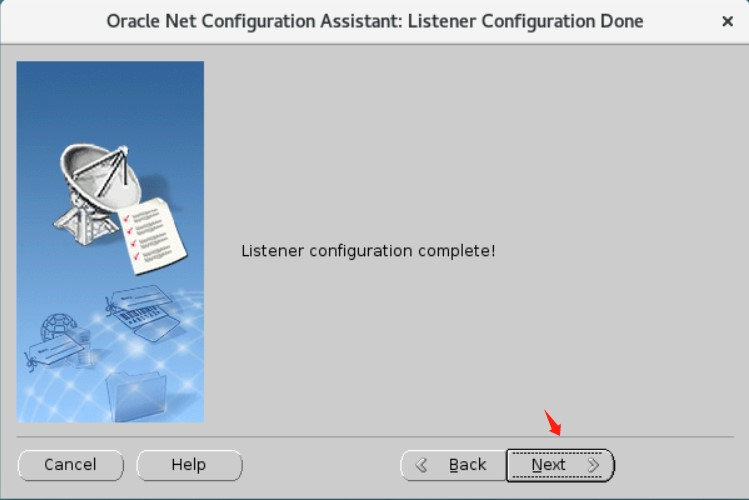
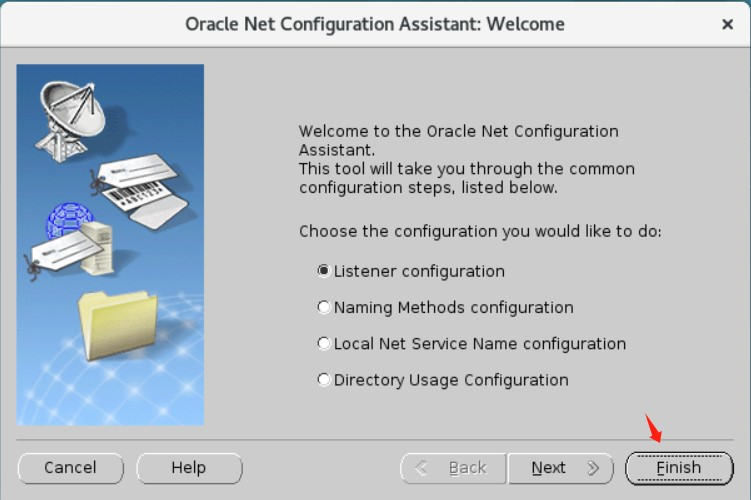
1、启动网络配置助手
[oracle@hellodba ~]$ netca
2、监听管理
2.1、查看监听状态
[oracle@hellodba ~]$ lsnrctl status
lsnrctl for linux: version 19.0.0.0.0 - production on 05-oct-2023 16:19:16
米乐app官网下载 copyright (c) 1991, 2019, oracle.  all rights reserved.
connecting to (description=(address=(protocol=tcp)(host=hellodba)(port=1521)))
status of the listener
------------------------
alias                     listener
version                   tnslsnr for linux: version 19.0.0.0.0 - production
start date                05-oct-2023 16:18:04
uptime                    0 days 0 hr. 1 min. 11 sec
trace level               off
security                  on: local os authentication
snmp                      off
listener parameter file   /u01/app/oracle/product/19.0.0/dbhome_1/network/admin/listener.ora
listener log file         /u01/app/oracle/diag/tnslsnr/hellodba/listener/alert/log.xml
listening endpoints summary...
  (description=(address=(protocol=tcp)(host=hellodba)(port=1521)))
  (description=(address=(protocol=ipc)(key=extproc1521)))
the listener supports no services
the command completed successfully
2.2、关闭监听
[oracle@hellodba ~]$ lsnrctl stop
lsnrctl for linux: version 19.0.0.0.0 - production on 05-oct-2023 16:19:34
米乐app官网下载 copyright (c) 1991, 2019, oracle.  all rights reserved.
connecting to (description=(address=(protocol=tcp)(host=hellodba)(port=1521)))
the command completed successfully
2.3、启动监听
[oracle@hellodba ~]$ lsnrctl start
lsnrctl for linux: version 19.0.0.0.0 - production on 05-oct-2023 16:19:51
米乐app官网下载 copyright (c) 1991, 2019, oracle.  all rights reserved.
starting /u01/app/oracle/product/19.0.0/dbhome_1/bin/tnslsnr: please wait...
tnslsnr for linux: version 19.0.0.0.0 - production
system parameter file is /u01/app/oracle/product/19.0.0/dbhome_1/network/admin/listener.ora
log messages written to /u01/app/oracle/diag/tnslsnr/hellodba/listener/alert/log.xml
listening on: (description=(address=(protocol=tcp)(host=hellodba)(port=1521)))
listening on: (description=(address=(protocol=ipc)(key=extproc1521)))
connecting to (description=(address=(protocol=tcp)(host=hellodba)(port=1521)))
status of the listener
------------------------
alias                     listener
version                   tnslsnr for linux: version 19.0.0.0.0 - production
start date                05-oct-2023 16:19:51
uptime                    0 days 0 hr. 0 min. 0 sec
trace level               off
security                  on: local os authentication
snmp                      off
listener parameter file   /u01/app/oracle/product/19.0.0/dbhome_1/network/admin/listener.ora
listener log file         /u01/app/oracle/diag/tnslsnr/hellodba/listener/alert/log.xml
listening endpoints summary...
  (description=(address=(protocol=tcp)(host=hellodba)(port=1521)))
  (description=(address=(protocol=ipc)(key=extproc1521)))
the listener supports no services
the command completed successfully
1、启动数据库配置助手
[oracle@hellodba ~]$ dbca
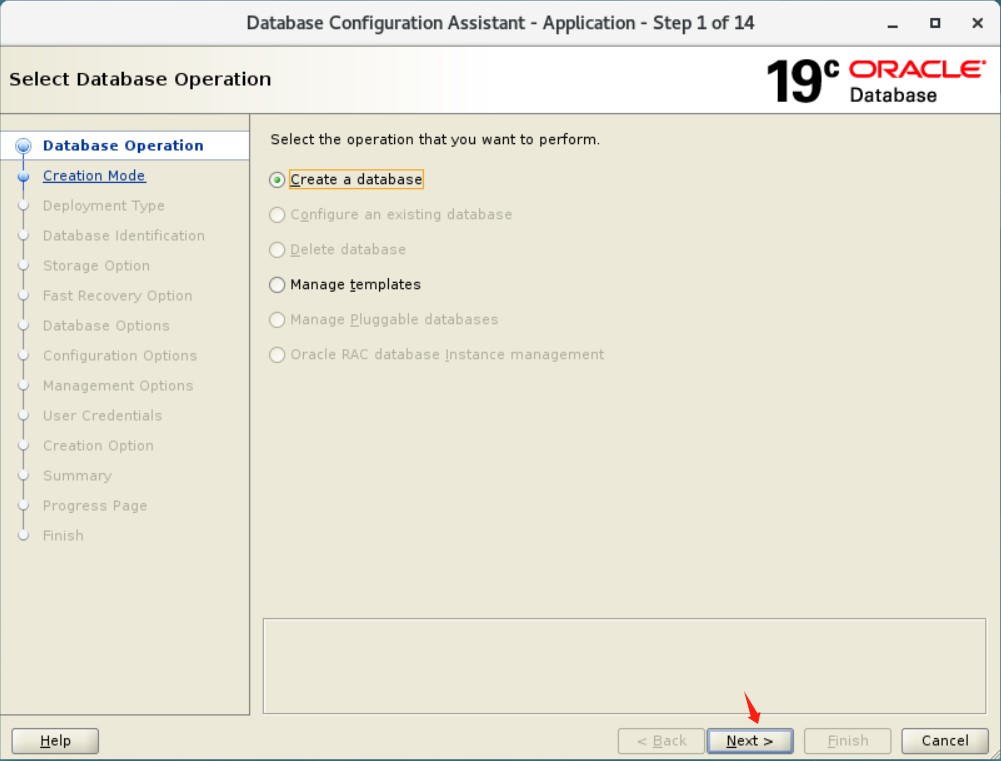
2、创建数据库
在“操作”窗口中,选择“创建数据库”,然后单击“下一步”以启动用于创建数据库的引导式工作流。
3、创建模式
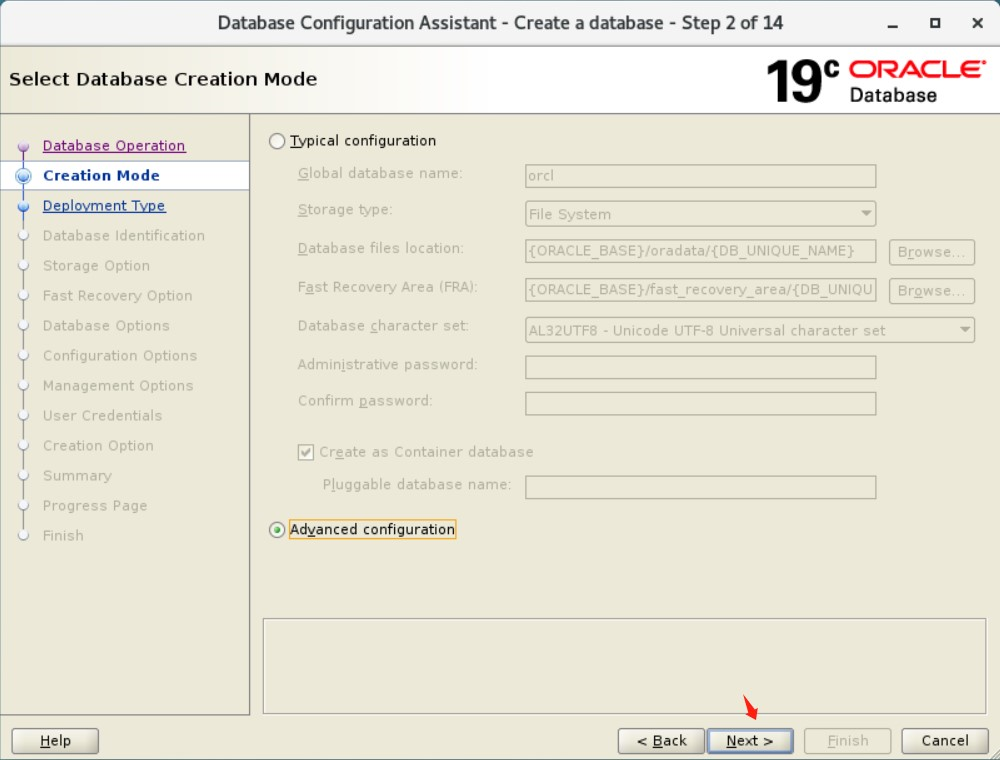
如果选择“高级配置”,则可以自定义管理员用户帐户的存储位置、管理选项、数据库选项和不同的密码。
如果选择“典型配置”,则在数据库的选项中进行选择较少,从而可以更快地创建数据库。
4、部署类型
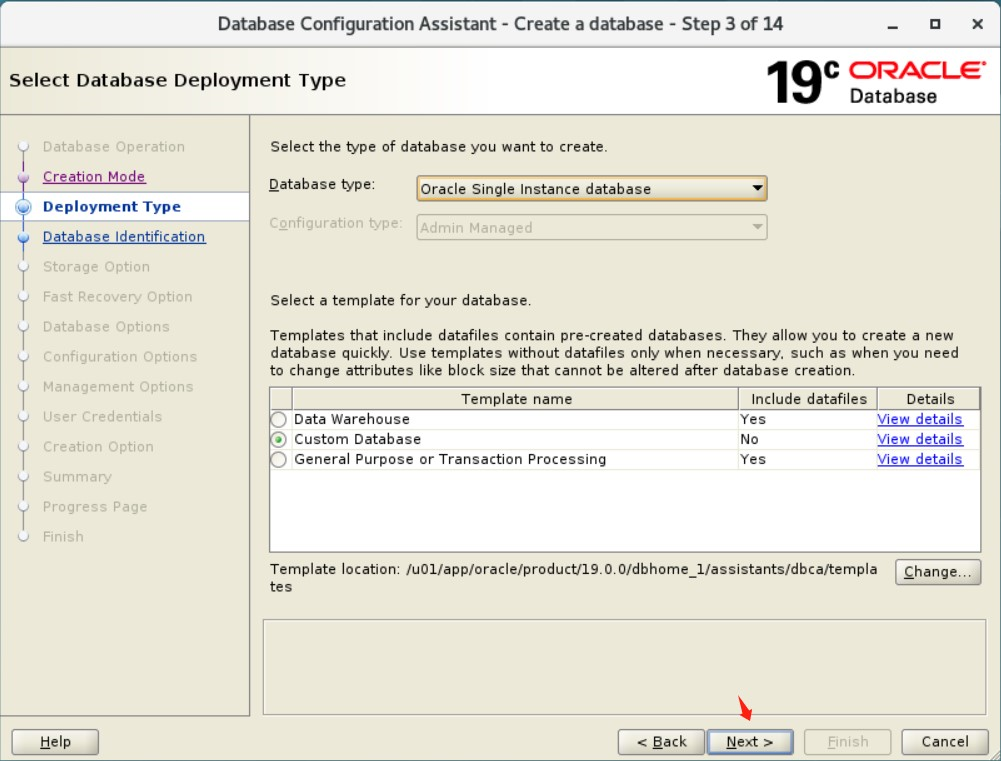
此窗口选择要创建的数据库的类型。
oracle 为以下两种工作负载类型提供模板:
general purpose or transaction processing(通用或事务处理)
data warehouse(数据仓库)
对于更复杂的环境,可以选择“custom database(自定义数据库)”选项。此选项不使用模板,会导致更复杂,这意味着创建数据库需要更长的时间。
5、数据库标识
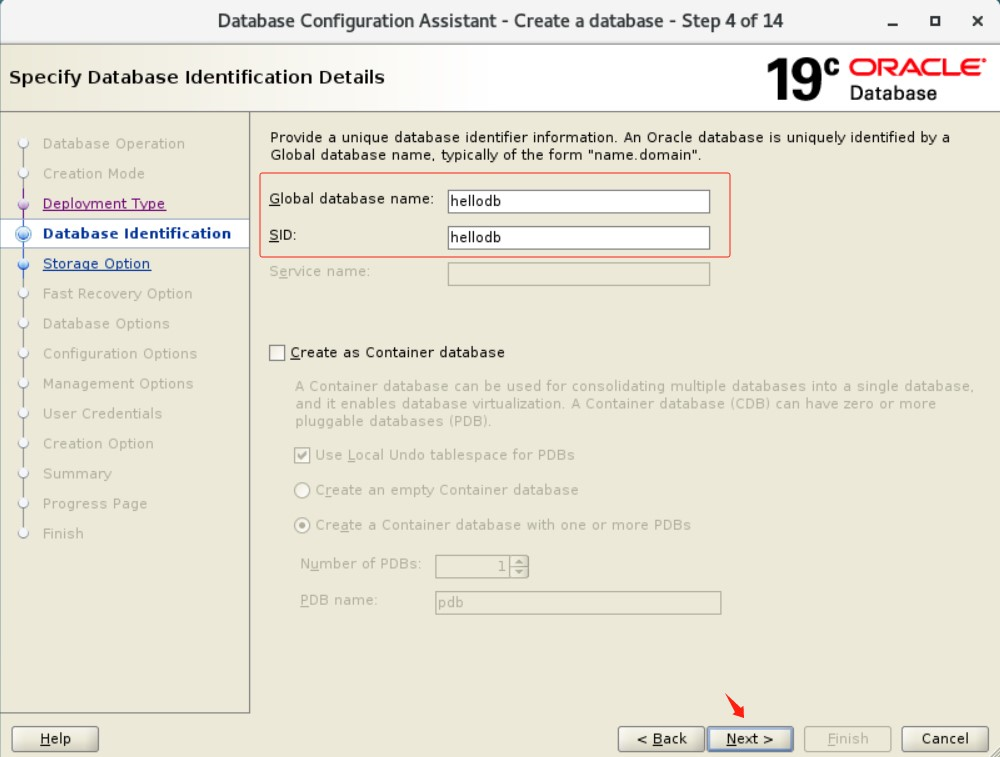
在“global database name(全局数据库名称)”字段中,输入数据库名称。
在 “sid ”字段中,输入系统标识符。sid 默认为数据库名称,并唯一标识运行数据库的实例。
如果启用“创建为容器数据库”选项,则会将数据库创建为可支持零个、一个或多个用户创建的可插入数据库 (pdb) 的多租户容器数据库 (cdb)。
如果不希望 dbca 在创建 cdb 时创建 pdb,请启用“创建空容器数据库”选项。
如果希望 dbca 在创建 cdb 时创建一个或多个 pdb,请启用“使用一个或多个 pdb 创建容器数据库”选项。然后在 pdb 数 字段中输入要创建的 pdb 数。在“pdb 名称”字段中,指定要用于创建一个或多个 pdb 的名称。创建多个 pdb 时,指定的 pdb 名称将用作要创建的 pdb 的前缀。
本实验创建非cdb模式。
6、存储选项
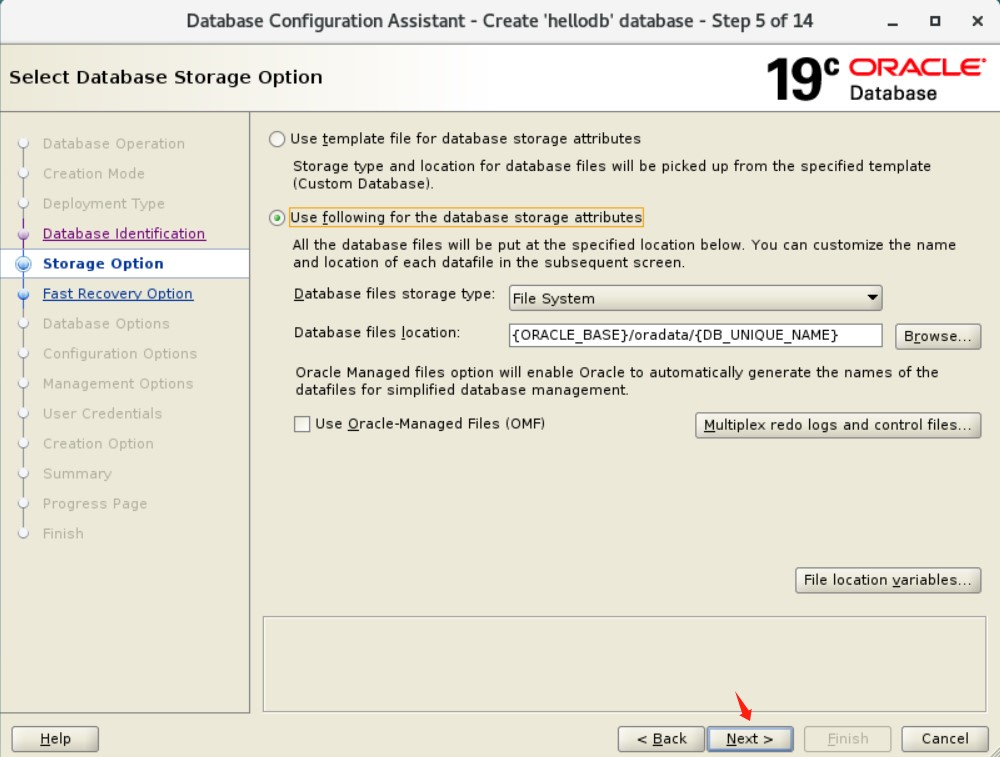
use template file for database storage attributes:此选项指示 dbca 使用模板中指定的目录信息。
use following for the database storage attributes:此选项要求您指定数据库文件的存储位置。
使用此选项,您需要选择如何管理数据库文件:
如果选择“文件系统”,则数据库文件由操作系统的文件系统管理。
如果选择自动存储管理 (asm),则将数据文件放在 oracle 自动存储管理 (oracle asm) 磁盘组中。
如果指定“使用 oracle 管理的文件 (omf)”选项,oracle 数据库将直接管理包含 oracle 数据库的操作系统文件。为所有文件指定默认位置(称为数据库区域)。此后,oracle 数据库会根据需要自动创建并删除此位置中的文件。选择此选项时,会将数据库文件的完整管理委派给数据库。您不再需要指定文件名、位置或大小。您还可以通过选择多路重做日志和控制文件来创建重做和联机日志文件的多个副本。
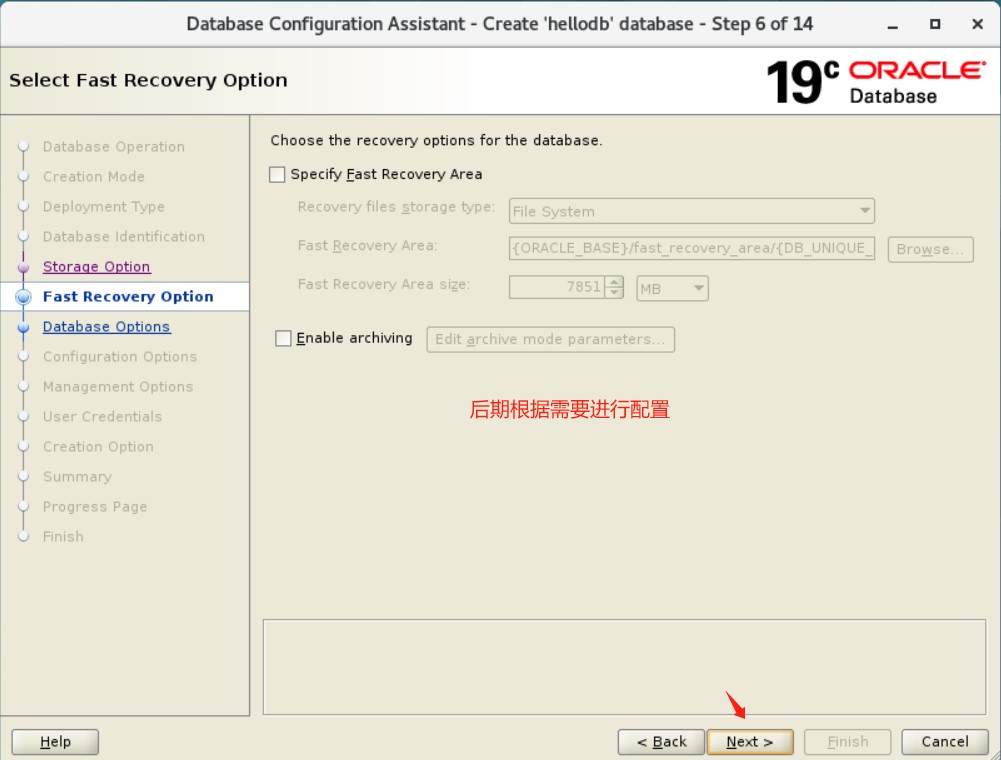
7、恢复区和归档配置
specify fast recovery area:选择此选项可指定备份和恢复区域及其目录位置和大小。
enable archiving:选择此选项可启用数据库联机重做日志文件的存档,这些文件可用于恢复数据库。
oracle 建议您选择“启用存档”。选择此选项可针对软件或硬件故障更好地保护数据库。如果现在未选择此选项,则可以稍后启用存档日志模式。
本实验暂不启用存档。
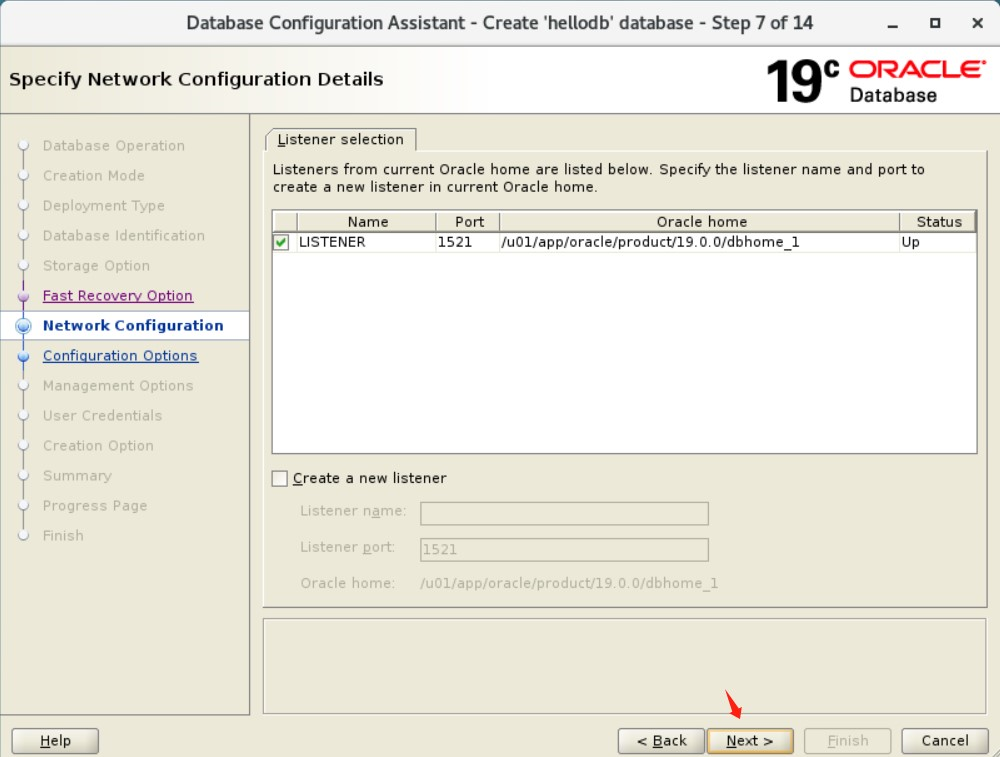
8、监听配置
显示当前 oracle 主目录中的侦听器。如果要在当前 oracle 主目录中创建新的侦听器,可以在“监听配置”窗口中执行此操作。
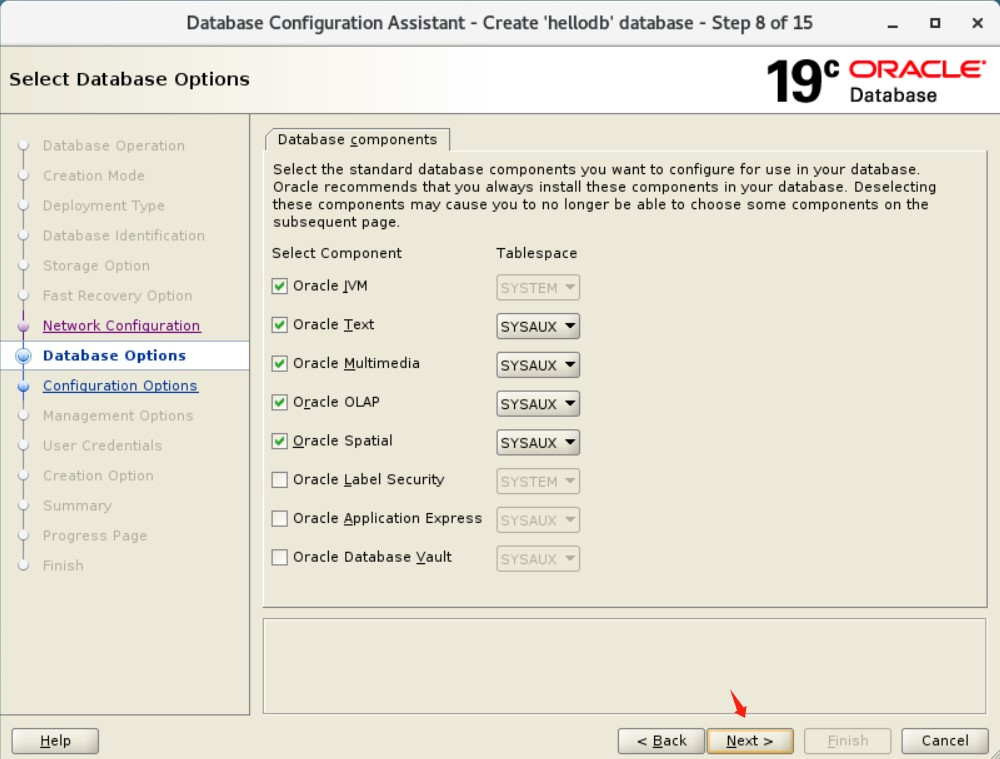
9、数据库组件选择
选择要配置在数据库中使用的组件。显示为禁用的组件,要么是没安装,要么依赖于未选择的组件。
10、初始化参数
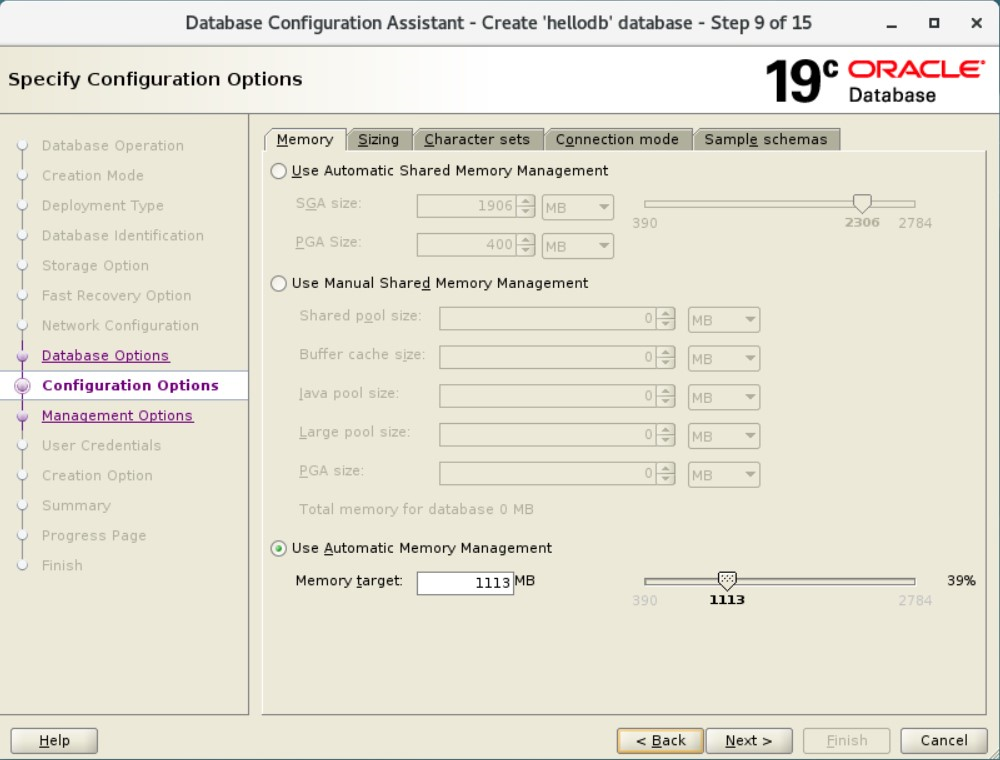
10.1、内存
use automatic shared memory management(使用自动共享内存管理):
此方法使您能够将特定数量的内存分配给 sga和pga。为 sga 启用了自动共享 内存管理,并根据需要将内存分配给各个pga。
use manual shared memory management(使用手动共享内存管理):
此方法要求您为每个 sga 组件和pga 输入特定值。您可以确定 sga 内如何在 sga 内存组件之间的分布方式。此方法适用于有经验的 oracle 数据库管理员。
use automatic memory management(使用自动内存管理):
此方法要求您在内存目标字段中设置 oracle 系统范围的可用内存,然后系统会自动调整 sga 的许多内存组件,并根据需要将内存分配给各个 pga。系统还可以根据处理需求动态减少或增加分配给 sga 和pga 的内存总量。用于数据库实例的总内存永远不会超过您指定的内存量。
注:如果数据库实例的总物理内存大于 4 gb,则无法选择使用自动内存管理选项。请改用自动共享内存管理。自动共享内存管理根据需要自动在各个组件之间分配可用内存,使系统能够最大限度地利用所有可用的 sga 内存。
经验值:
sga < 物理内存 * 80% * 80%
pga < 物理内存 * 80% * 20%
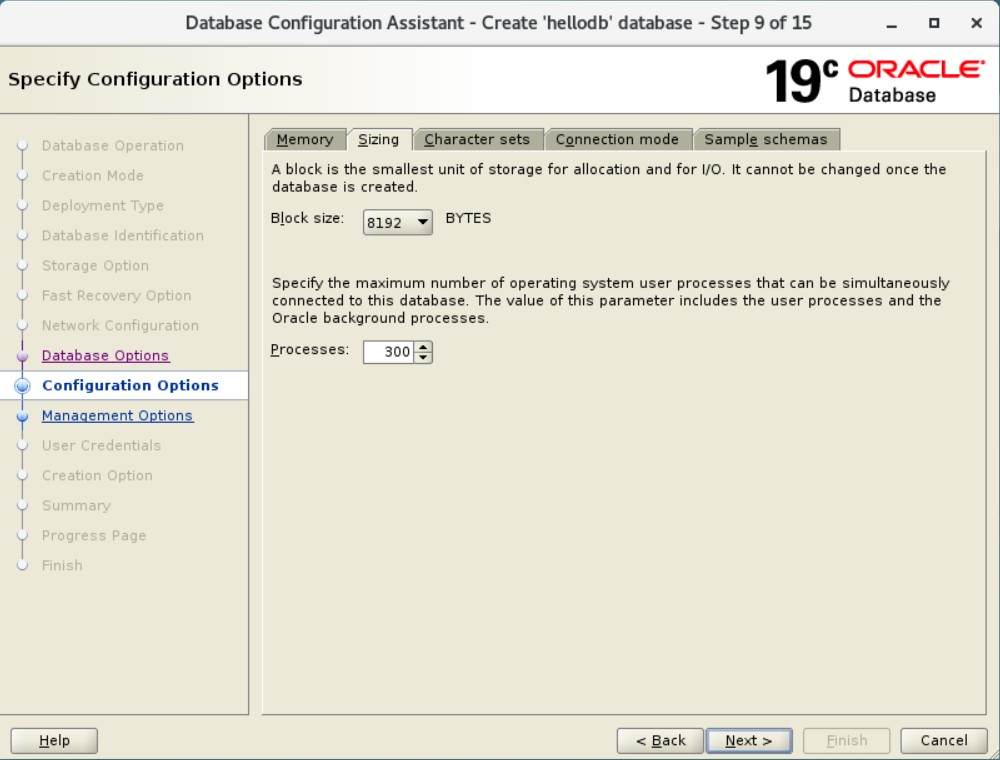
10.2、块大小和用户进程数
在此选项卡中,您可以指定可以同时连接到数据库的最小块大小和操作系统用户进程的最大数量。
block size(块大小): 使用此列表选择块大小,或接受默认值。oracle数据库数据存储在指定大小的数据块中。一个数据块对应于磁盘上特定数量的物理空间字节。选择默认8192 bytes。
processes(进程): 指定可以同时连接到数据库的进程的最大数量。此参数的默认值是300。根据具体需要进行调整。
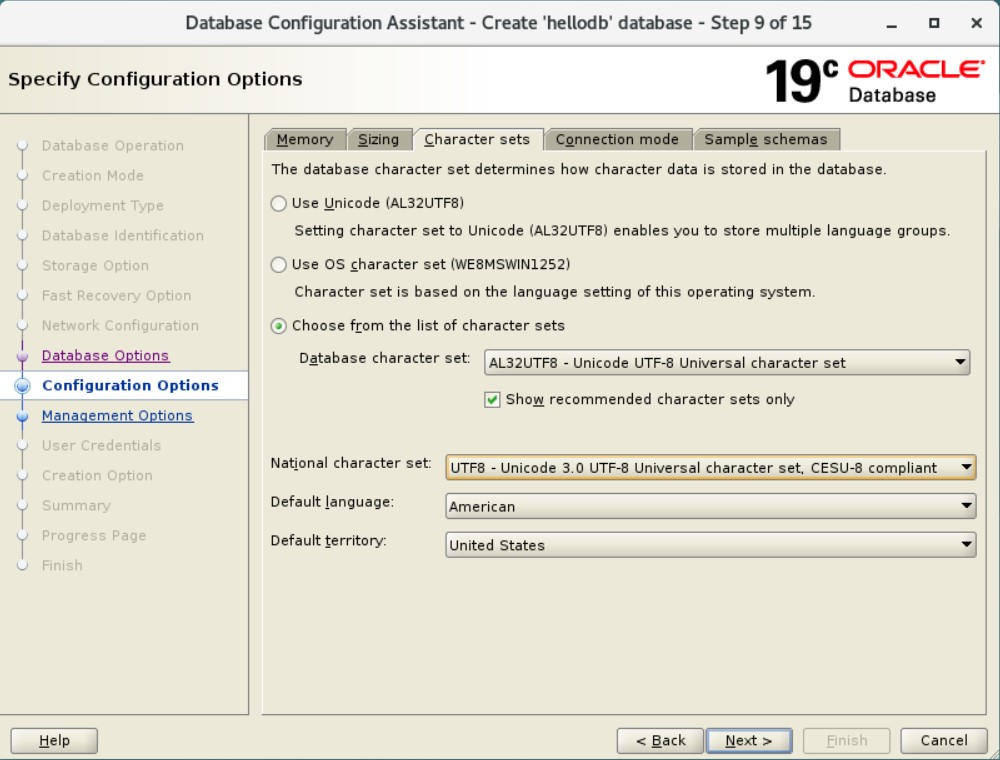
10.3、字符集
使用此选项卡定义数据库使用的字符集。字符集是用于在计算机屏幕上显示字符的编码方案。字符集决定了数据库中可以表示哪些语言。
oracle建议使用unicode(al32utf8)作为数据库字符集。al32utf8是oracle对unicode标准utf-8编码的名称。unicode标准是通用字符集,支持世界上目前使用的大多数语言。使用unicode标准对于任何多语言技术(包括数据库处理)都是必不可少的。在创建数据库并积累生产数据后,更改数据库字符集是一个耗时且复杂的项目。因此,在安装时选择正确的字符集非常重要。即使数据库目前不存储多语言数据,但预计将在几年内存储多语言数据,为数据库字符集选择al32utf8通常是唯一好的决定。
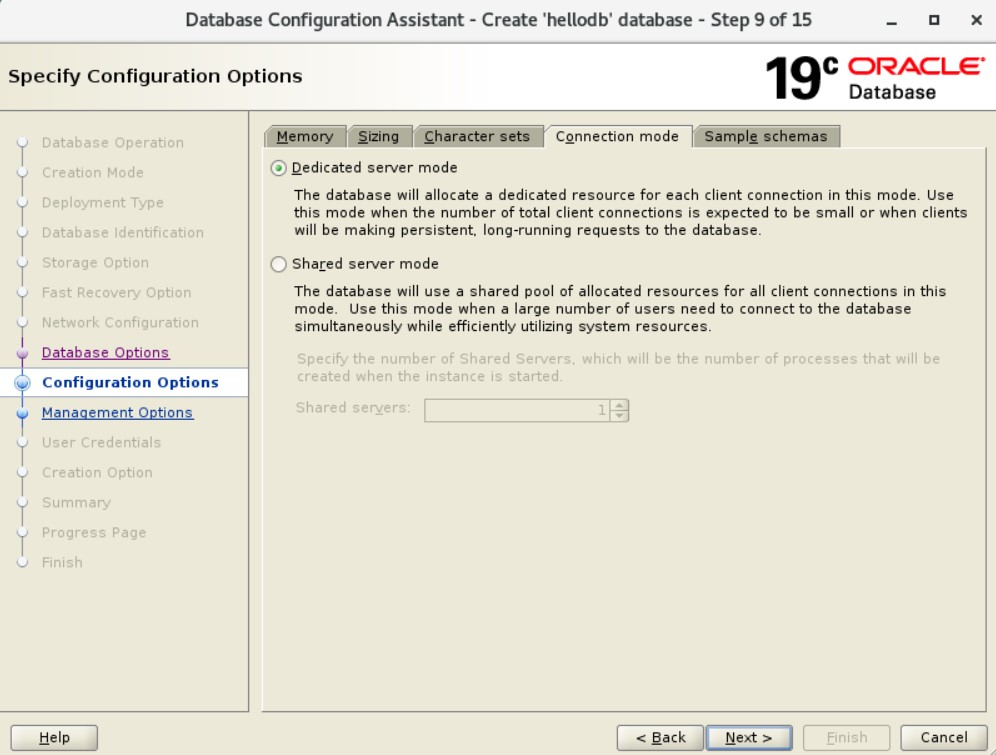
10.4、连接模式
使用此窗口选择数据库模式。您可以在以下任一模式下运行数据库:
专用服务器模式: 此模式允许每个用户进程的专用服务器进程。当客户总数预计很小(例如50个或更少)时,请选择此选项。当数据库客户端通常向数据库发出持久、长期运行的请求时,您也可以选择此选项。默认情况下,数据库是为专用服务器进程配置的。
共享服务器模式: 此模式允许多个客户端连接共享数据库分配的资源池。在客户端负载预计会对内存和其他系统资源造成压力的配置中使用此模式。如果您选择共享服务器模式,那么您必须在启动数据库实例时指示要创建的服务器进程数量。
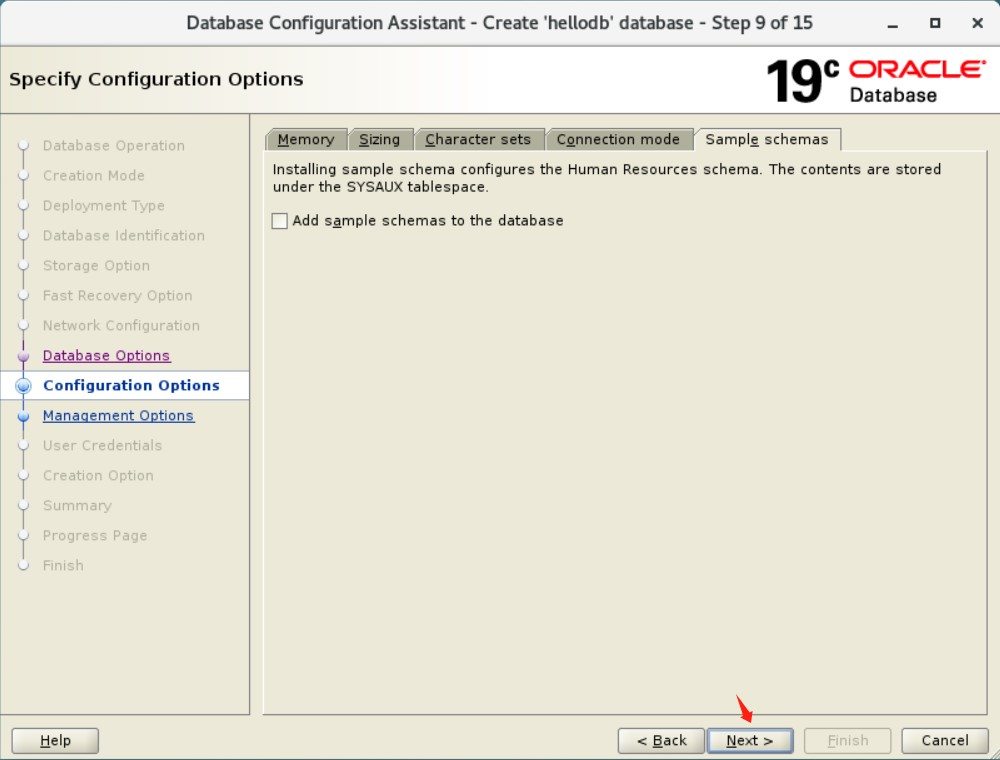
10.5、示例模式
若要在数据库中包括示例架构,请选择“add sample schemas to the database”。
11、管理选项
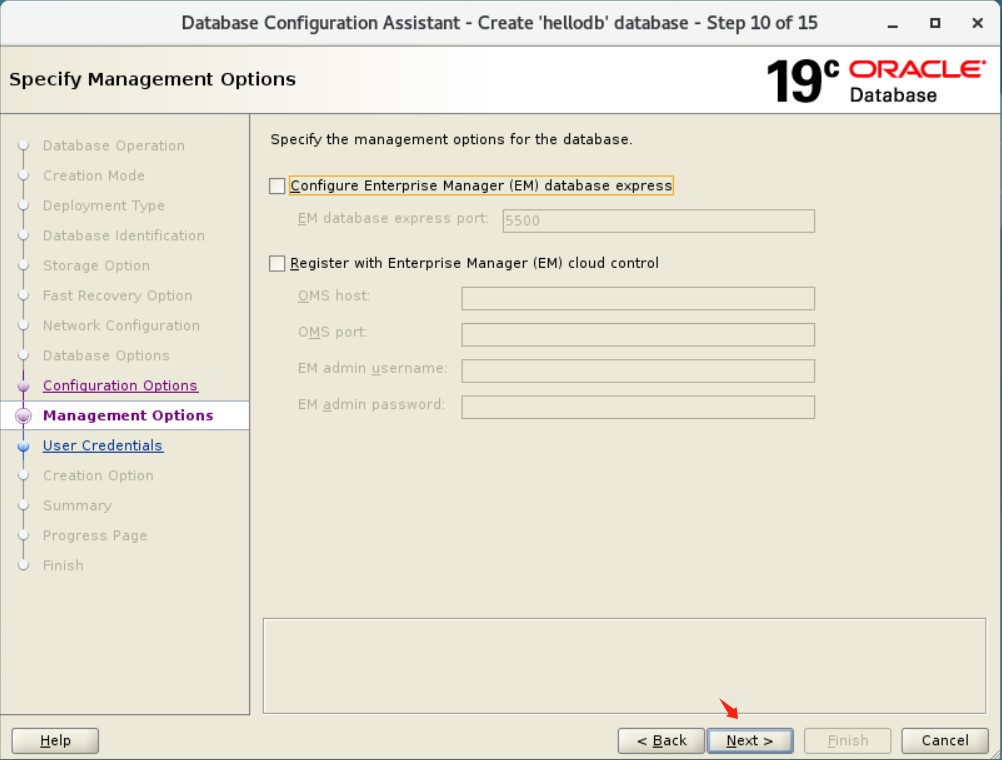
oracle enterprise manager 为单个数据库提供基于 web 的管理工具,并为管理整个 oracle 环境提供中央管理工具。
若要在本地管理数据库,请选择“configure enterprise manager (em) database express”。
本实验不配置em管理器。
12、数据库凭证
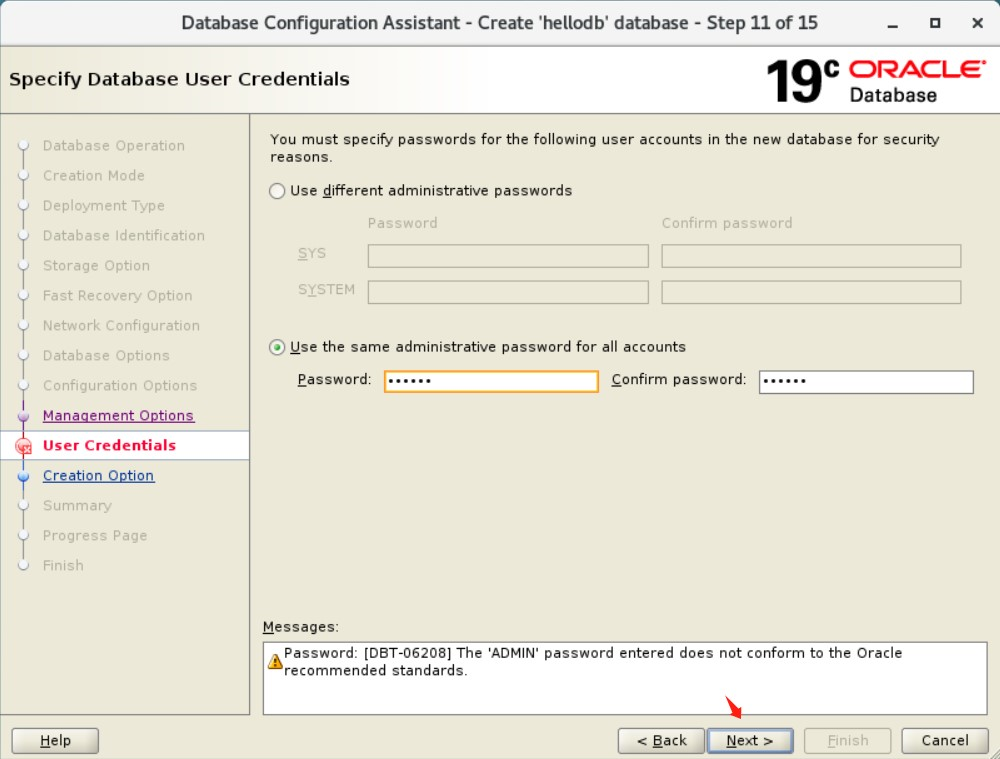
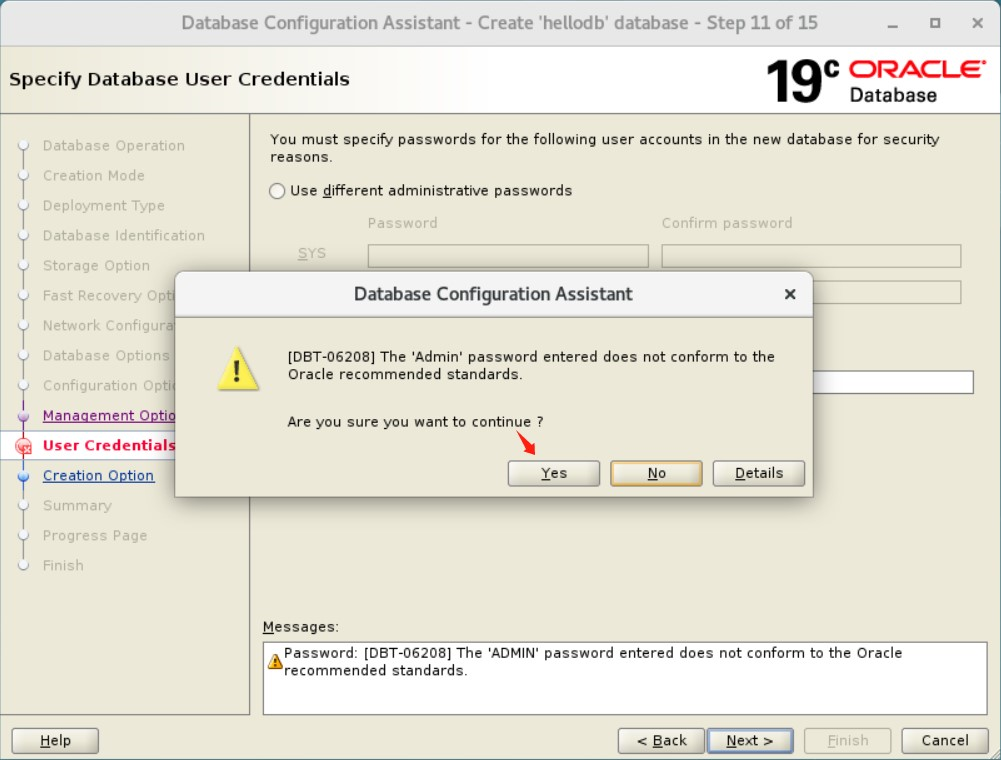
为用户sys和system设置统一密码。
13、创建选项
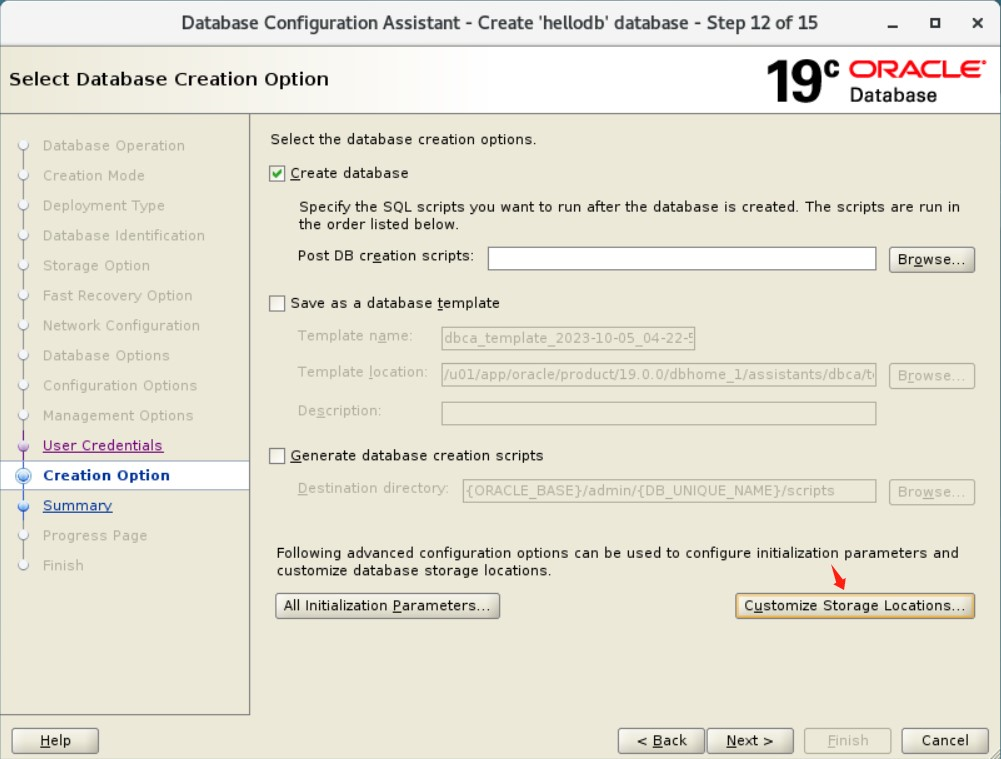
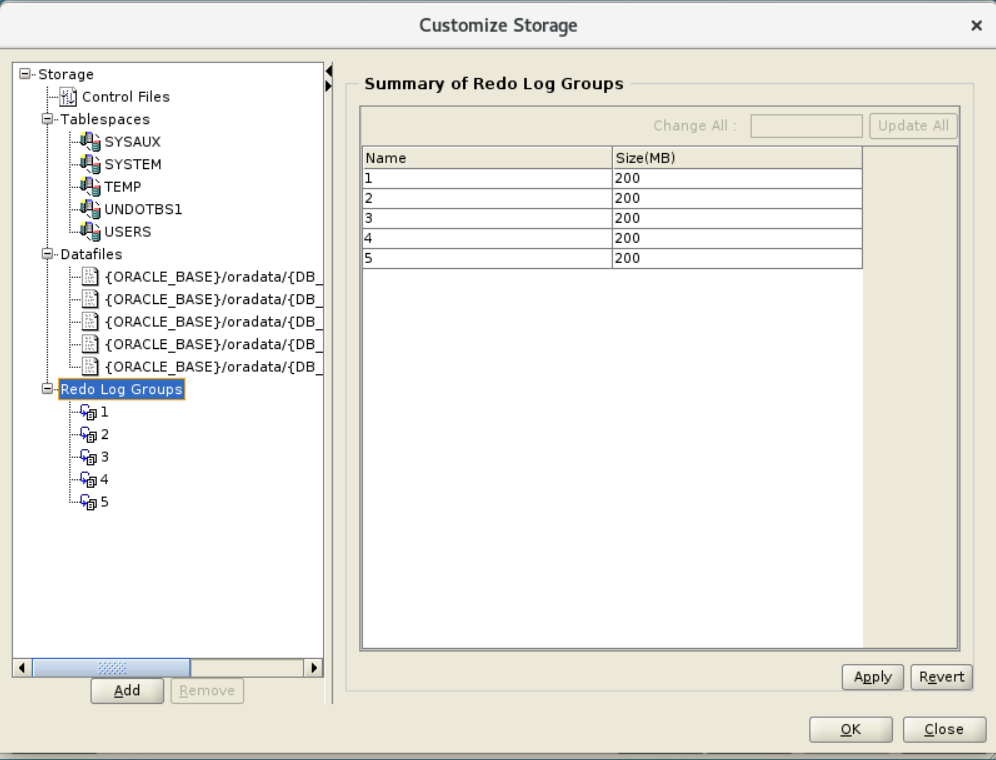
此窗口中,可以对控制文件、数据文件、联机重做日志组等进行调整。如果对存储结构或参数不满意,则可以进行更改。
这里对redo log(在线重做日志)进行简单调整下:redo log需根据实际情况进行调整大小,如果存在大量dml操作,为了防止频繁切换日志,建议设置大点提高性能,但不是越大越好,建议切换频率在15分钟左右一次。我这里先暂设置5组200mb。
14、创建数据库
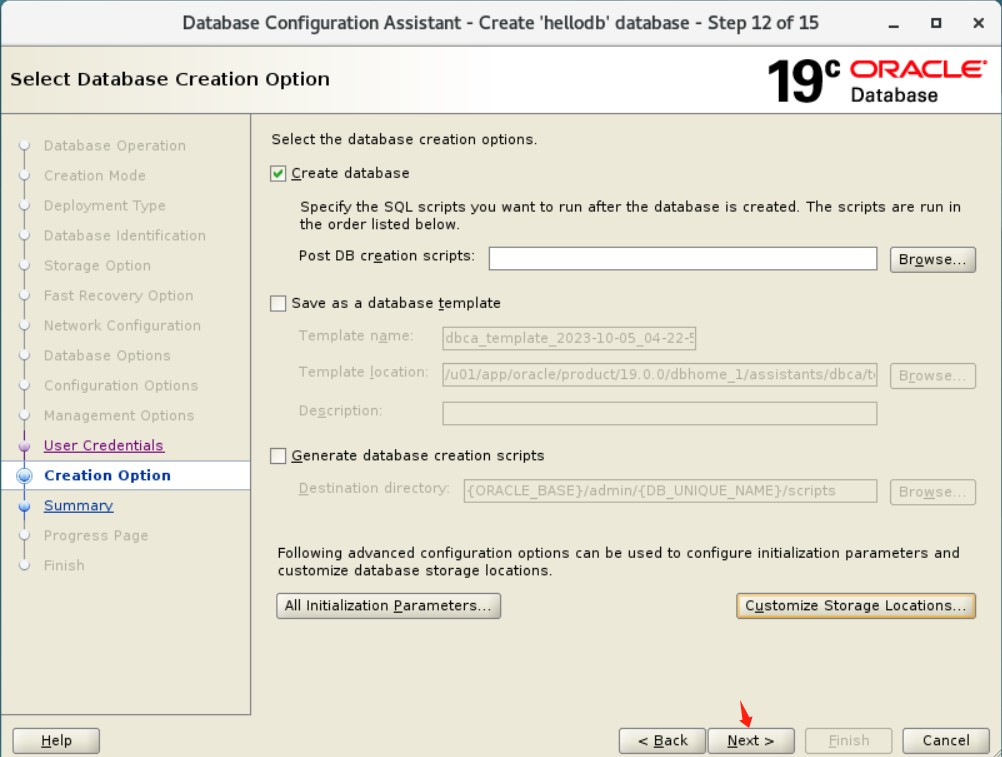
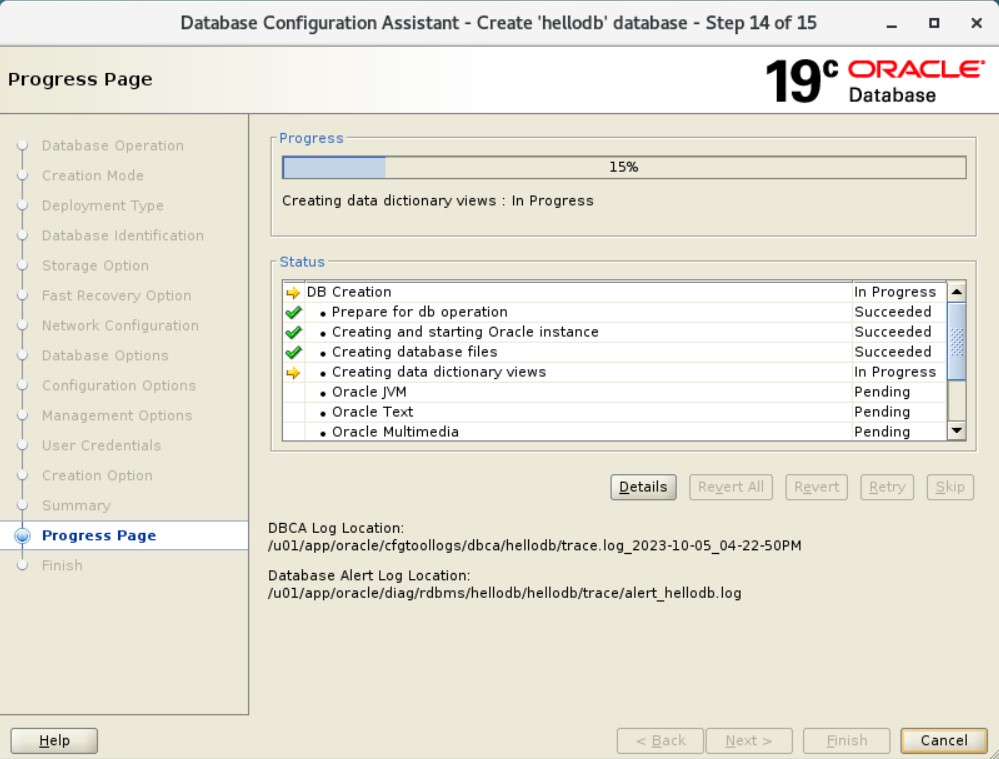
点击“next”开始安装数据库。
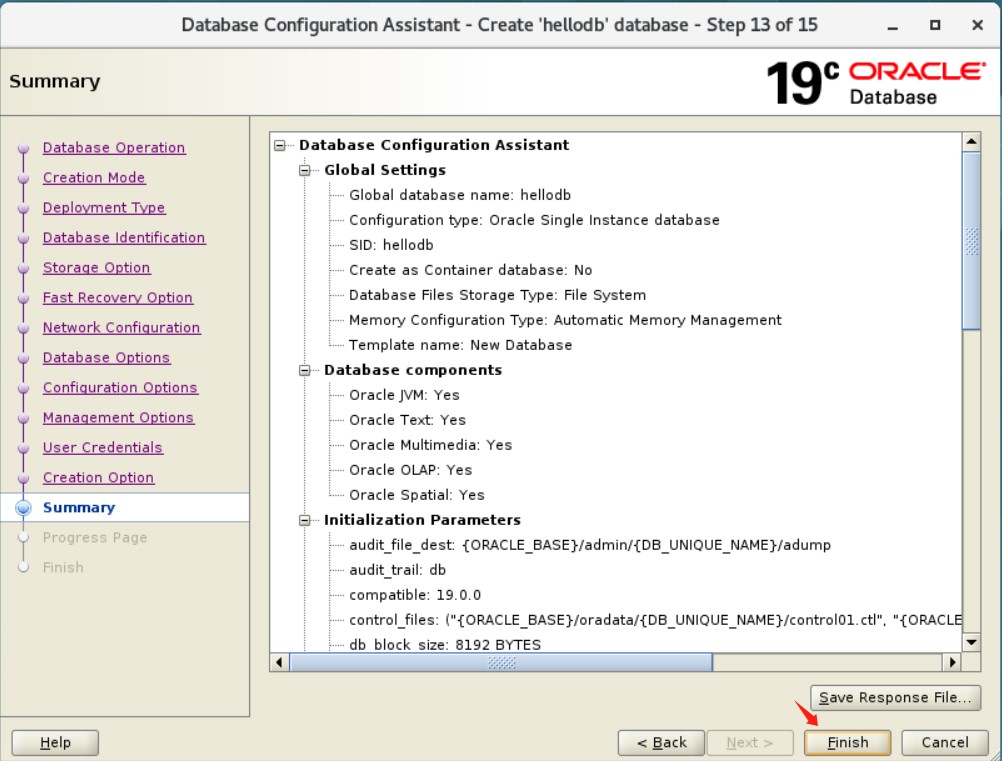
注意:从 oracle 数据库 11g release 2 (11.2) 开始,您可以通过单击保存响应文件将所有安装步骤保存到响应文件中。稍后,此文件可用于静默安装。
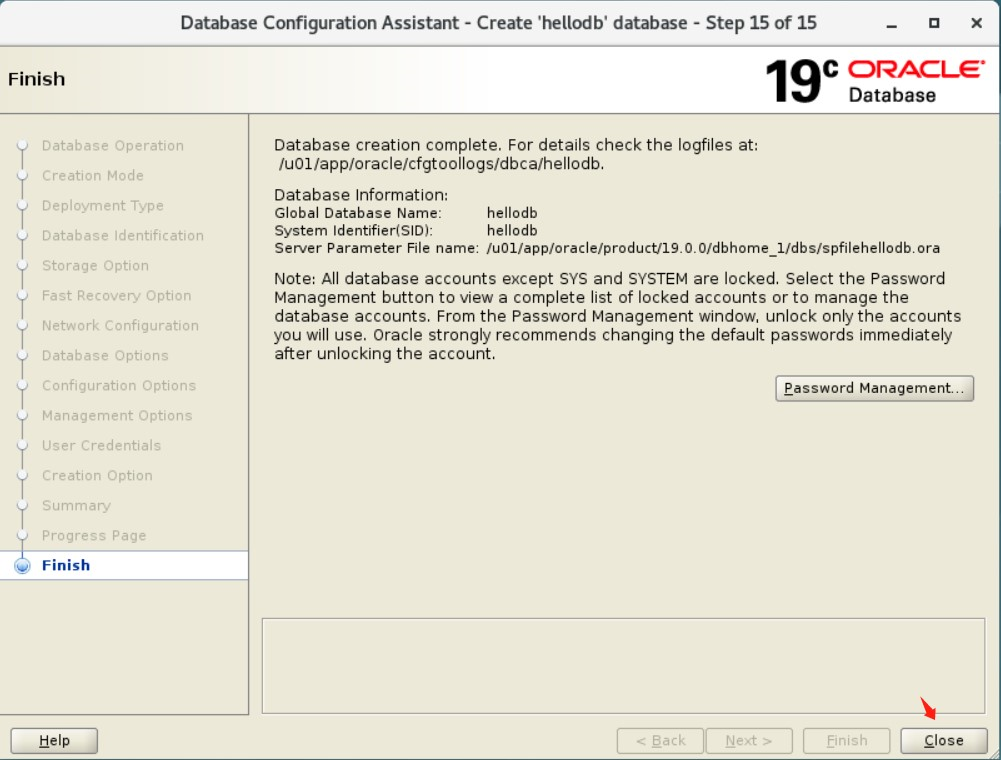
15、数据库创建完毕
单击“close”结束安装,并退出安装程序。
1、启用sql*plus从命令行连接到数据库
[root@hellodba ~]# su - oracle
[oracle@hellodba ~]$ sqlplus / as sysdba
2、查看数据库基础信息
sql> select name,log_mode,open_mode,platform_name,db_unique_name from v$database;
name      log_mode     open_mode            platform_name              db_unique_name
--------------------------------------------------------------------------------------
hellodb   noarchivelog read write           linux x86 64-bit           hellodb
3、查看数据库版本
sql> select banner_full from v$version;
banner_full
-----------------------------------------------------------------------
oracle database 19c enterprise edition release 19.0.0.0.0 - production
version 19.3.0.0.0
4、查看数据库字符集
sql> select * from nls_database_parameters where parameter like '%characterset%';
parameter                      value
--------------------------------------------------------------------------------
nls_characterset               al32utf8
nls_nchar_characterset         utf8
5、查看数据库块大小
sql> show parameter db_block_size
name                type        value
-------------------------------------------
db_block_size       integer     8192
6、实例的启动与关闭
6.1、启动
[root@hellodba ~]# su - oracle
[oracle@hellodba ~]$ lsnrctl start
[oracle@hellodba ~]$ sqlplus / as sysdba
sql> startup
6.2、关闭
[root@hellodba ~]# su - oracle
[oracle@hellodba ~]$ lsnrctl stop
[oracle@hellodba ~]$ sqlplus / as sysdba
sql> shutdown immediate;
7、取消180天密码过期限制
sql> select * from dba_profiles where profile='default' and resource_name='password_life_time';
profile                        resource_name                    resource_type limit
-----------------------------------------------------------------------------------------------
default                        password_life_time               password      180
sql> alter profile default limit password_life_time unlimited;
sql> select * from dba_profiles where profile='default' and resource_name='password_life_time';
profile                        resource_name                    resource_type limit
-----------------------------------------------------------------------------------------------
default                        password_life_time               password      unlimited
8、关闭审计
sql> show parameter audit;
name                                 type        value
-----------------------------------------------------------------------------------------------
audit_file_dest                      string      /u01/app/oracle/admin/hellodb/adump
audit_sys_operations                 boolean     false
audit_syslog_level                   string
audit_trail                          string      db
sql> alter system set audit_trail=none scope=spfile; (重启数据库生效)
9、调整db_files
sql> show parameter db_files;
name				     type	 	 value
---------------------------------------------------------------------------
db_files			     integer	 200
sql> alter system set db_files=1024 scope=spfile; (重启数据库生效)
到此red hat enterprise linux 7.6 oracle 19c单机部署完毕,并进行了一些常规的设置。安装oracle数据库需要有一定的专业知识和经验,在实际操作中,可能还会遇到其他问题和挑战,建议在进行安装之前详细阅读相关文档和指南,并确保有必要的m6米乐安卓版下载的技术支持和备份措施。
由于本人有限的能力和知识储备,可能存在错误或疏漏之处,如有错误敬请批评指正!
公众号:hello dba


